Monday, March 4, 2013

DESIGNER CRAFTS CONNECTION - FIRST MONDAY IN MARCH

THE DCC THEME FOR MARCH IS - FAVORITE TECHNIQUES!

I pondered over this post for a while, because I have discovered and been taught so many wonderful techniques over the years, but I kept coming back to my favorite technique of all time - CRACKLE!  Crackle is so very versatile, textural and just down right amazing that I had to share it with you today!
 
 
I have been layering and crackling paint on various surfaces since I first started crafting as a child.  Back then my tools and supplies were limited and the first time I achieved the crackled paint effect it was purely an accident, but I have been in love with the effect ever since! 
 
When I was 9 or 10 I received a hand-me-down kitchen table and chair set from a family friend for my dollhouse that was already painted red.  Some of the pieces were loose, so I glued those first and wasn't very neat with my technique, so a smeared the extra glue over the surface of the chair seat to dry because I knew I was going to repaint them.  When I painted the blue over the areas that had the dried glue this wonderful feathery crackle finished appeared and I was hooked! 
 
Using traditional white glue (like Elmer's) is less expensive than using a medium, but you have a very small window of opportunity with the White glue and the result is not as consistent.
 
Over the years I have tried many products for crackling, but I keep coming back to one for it's ease of use - Americana Paints Weathered Wood Medium by DecoArt.  This particular medium stays workable for quite a long time - I have event left it overnight, then applied a top coat in the morning and the crackle effect was wonderful.

OK, enough talking, let me show you the wonderful examples of this technique.


Above is a simple piece of white foam board that I painted with Americana Paints Burnt Umber.  I let the base coat dry completely then applied the Weathered Wood Medium in a thin coat (top - this will give you smaller cracks) and a very heavy coat (bottom - this will give you larger cracks). 
 
Let the medium set up for at least 30 minutes, but like I said earlier, I have let it sit overnight before.  The crackle effects works the best when you apply a contrasting top coat and I like the dark base coat with a light top coat effect the best for a Shabby Chic finish.  To apply the top coat you must move quickly and only paint over the surface once - do not go back over your paint strokes or the crackle will not appear. 
 
 
In this first example (above) I have painted a thin top coat of Americana Buttermilk over my thin Weathered Wood coat with my strokes all going in the same direction to reveal fine, thin almost feathery cracks.


In the second example (above) I have painted the Americana Buttermilk in very thick and random strokes over the thick Weathered Wood coat to reveal thicker and chunkier cracks.
 
I played around with some colors and application thicknesses of the paints and Weathered Wood medium, just to give you an idea of how versatile this technique truly is. 
 
 
Lighter base coats with darker top coats.


Different color combinations and thicknesses of the Weathered Wood medium.
 

Then I tried some metallics, which I had not worked with the crackle.  The sample to the left is Dazzing Metallics Glorious Gold base coat and Burnt Umber top coat, which looks very nice, especially up close.  The sample to the right is Burnt Umber base coat with Patio Paint Pot O' Gold top coat.  Not sure what the Patio Paint has added to it for durability in exterior applications, but it did not crackle well at all.
 
The surfaces that you can apply a crackle technique to are endless.  In my sample projects above I have crackled on Smoothfoam Balls, a Canvas, Wooden Candlesticks and scrapbook Paper, but the applications are endless.  Try crackle on air dry clay, paper mache, plaster, scrapbook paper, cardboard and even ceramic bisque!
 
I hope you have enjoyed my favorite technique today.  Please use the Designer Crafts Connection icon on my right hand task bar to hop around to all of the other DCC Crafters to see what their favorite techniques are!  I can't wait to check them all out!

We also have a contest for March from FABSCRAPS!  Don't forget to "like" their FB page

To enter to win, hop through the blogs and then leave a comment on whichever blogs have the technique you think will be your new favorite (pick me, pick me!) and then visit Julie McGuffee's Life in the Craft Lane blog to leave a comment there saying which technique(s) you liked...you have so many chances to win! Julie will pick a winner from all the comments in the hop at the end of March. Good luck!
 
Thanks for stopping by! - Beth


Sunday, February 3, 2013

DESIGNER CRAFTS CONNECTION - FIRST MONDAY IN FEBRUARY

Our theme for February is - of course - Handmade with Love!

Today I want to share a 3D mixed media heart that I made to hang on my front door instead of a traditional wreath.

I started out with a paper mâché heart form purchased at Michael's. Then covered randomly with crumpled patterned scrapbook paper and vintage music sheet pieces. Dry brush with coordinating Americana Paints from DecoArt - I used Petal Pink, Country Red and Barn Red. Create texture by dipping a cardboard tube, end of paint brush and bubble wrap in various paints and layer over the papers.

Die cut flowers from colored tissue paper and vintage book pages using the Big Shot from Sizzix. Layer flowers on a brad, crumple and distress with Coffee Glimmer Mist by Tattered Angels. Attach three flowers to top of heart. Cut two leaves from green patterned scrapbook and attach to either side.

Embellish with rhinestones, pearls and metal charms. Attach patterned and satin ribbons for a hanger. Finish with a bow. Hang and enjoy!

Hop around and take a look at all of the projects that my fellow Designers have created for Valentine's Day by using the DCC navigation on the right hand toolbar.

Thanks for stopping by - Beth

Monday, January 7, 2013

DESIGNER CRAFTS CONNECTION - FIRST MONDAY IN JANUARY!!

HAPPY NEW YEAR!

Today is the first Monday and that means it is our Designer Crafts Connection Blog Hop!  This month's them is HOME DECOR. 

I create quite a few home decor items out of found objects, craft store items and thrifted treasures, so this month's theme is right up my alley!


First, I want to share a set of candlesticks that I created for my mantle.  I had seen chunky decorated candlesticks like this at Pottery Barn and Anthropoloy, but didn't want to spend the money, so I looked around until I found some items I could alter into exactly what I wanted!

Two are thrift store finds and the third I created to match with a candlestick and wooden plaque purchased at the craft store.  They are painted in a distress finish with Americana Paints from DecoArt.  The wire bird and birdcage were also craft store finds and the apothecary jar was made from a recycled salsa jar and wooden knobs.


Second, is a set of silhouette plaques to match the candlesticks!  The plaques are craft store purchases that I distressed painted to create an aged look.  I then covered them with old book pages that I found at a local thrift store.  The silhouettes are a K & Company find from the craft store, but they were originally ivory.  I selected the images I liked the best and lightly sprayed them several times with Design Master Colortool Spray Paint in Flat Black.

Look around, take inspiration from everywhere and create some home decor items that have greater personal meaning - because YOU MADE THEM!

Please visit the rest of the Designers in our DCC Blog Hop ring to see the Home Decor items that they have made by clicking on the HOP FORWARD and HOP BACK buttons on the navigation icon in my right hand tool bar.

Thanks for stopping by!  -Beth


Friday, December 28, 2012

MERRY CHRISTMAS & A HAPPY NEW YEAR!


Just wanted to post a quick share today!

I was featured in the Holiday 2012 issue of Stitch Craft Create magazine with my Peace on Earth Wreath.  Check out their website here and their blog here to get lots of great ideas!

There are three pages of photos along with complete instructions!  I used a technique that was new to me - I wrapped the wreath form in stitched paper ribbon by cutting lenghts of scrapbook paper, crumpling them and then joining them all together on my sewing machine.  The look is very Shabby Chic!

I was also featured in the Winter issue of Crafts n' Things magazine with my Santa Button Beard Pillow.  Check out their website here and their blog here for lots of ideas and inspiration!


This project was special to me because most of the buttons that I used were from my Grandmother's button box.  I painted the Santa face on cross stitch fabric, then sewed the buttons and jingle bell on.  I have this pillow prominently placed on my couch this Christmas!

I wish everyone a Happy, Healthy and Prosperous New Year in 2013!

Thanks for stopping by!  -Beth

Friday, November 16, 2012

FABER CASTELL GELATOS

FAUX LEATHER MASKING TAPE JOURNALS

I worked with these Gelatos from the Faber Castell Design*Memory*Craft line at the CHA Summer Show and then I picked some up in several different color families at Michael's to play with them.  I was looking around my studio for a surface and saw four rolls of masking tape that I had on hand from another project and thought that the tape would make a versatile surface.  I also had some small blank books on hand, so decided to create some colorful journals.


Here's how I made it:
  • Lay out several lengths of masking tape on a workable surface.  I used my Inksentials Craft Sheet from Ranger.
  • Next, just start scribbling - what fun!  I mixed and matched colors, then misted the maksing tape with water and blended with the paint brush included in the Gelatos Mix & Match set.
  • Keep layering and blending until you get the effect you are looking for. This was actually extremely fun and relaxing! Crafting as therapy - LOVE IT!  I blotted some strips with a paper towel and others with my paint brush, but I think that they all look like faux leather!

  • Once all of the masking tape strips are colored and dry, measure your book cover (or surface of your choice) and cut to length.
  • I used the widest strip of masking tape on the spine of the book, so I had enough to wrap around the front and back covers.  Cut a small "V" at the folds of the book and wrap the edges of the masking tape in on inside of the front and back covers.
  • Lay out different colors and widths of the colored masking tape until the front and back covers are completely covered.  Make the final piece of masking tape wide enough to wrap around the inside edge of the book.  Cut the tape at an angle, so the finished edge is as neat as possible.  Then burnish all surfaces with a bone folder (or old credit card) to smooth out and bubbles and create a good adhesion to the surface of the book. 
  • Using the Stamper's Big Brush Pen in Black I inked the clear stamps that came with the Gelatos Mix & Match set and stamped the Damask and Flower pattern on the front cover of my journal books.  I found that the stamping worked better on the masking tape if I lightly misted the stamp after I inked it with the Big Brush Pen.
  • The last step is to measure, cut and adhere a coordinating paper to the inside front and back covers to hide all of the tape edges and finish the Journal.

I am going to be giving out these mini Journals as stocking stuffer Christmas presents.  They are the perfect size to carry in your purse for important notes and ideas!

Thanks for stopping by!  -Beth

Monday, November 12, 2012

WINTER HOLIDAY HOP

Today, I am joining a group of talented Designers in the Winter Holiday Hop, organized by Jen Goode, who is hosting the linky party on her blog.  So, happy to have been invited to share my Holiday Inspiration with everyone today!  Click on the WINTER HOLIDAY HOP button in my right hand sidebar to hop around!
 
I LOVE SNOWMEN, there I have said it!  Isn't admitting you have a problem the first step to recovery?  Well, truth be told, I don't want to recover from my Snowman addiction, but I do want to share with everyone today, some of my most favorite Snowman projects!
 
This Snowman is made from a simple foam ball and painted craft foam pieces.
 
Glass Hurricane Snowman with painted features, a felt hat and plaid scarf.

 
Altered Altoids Tin painted to look like a Snowman on TV with wire and beaded antennae.
 
This cute little Snowman is painted on a hinge from the hardware store!
 
A $1 section basket from Michael's painted with a Snowman face, ear muffs made from the
basket handle and faux fur.
 
Snowmen (and women) treat cups made from peate pots, fabric scrap "carrot" noses and button eyes!
 

Don't forget to click through and see what all of the Designers have made and be inspired to start creating for the Holidays!
 
Thanks for stopping by!  -Beth
 

DESIGNER CRAFTS CONNECTION SMOOTHFOAM 2 X 4 SNOW FAMILY

Welcome to the Designer Crafts Connection Blog Hop with Smoothfoam!


Many of us have seen Smoothfoam display in our local Michael's stores, but beyond the normal projects with foam shapes, the Designer Crafts Connection was challenged with creating something "outside the box!"  I was thrilled to receive a few different shapes, but was drawn to the 2" by 4" foam rectangles. I have seen alot of 2" by 4" wooden crafting for the holidays, but I don't have access to power tools, so when I saw these rectangles, I knew I wanted to use the Smoothfoam 2 by 4's in the 8" and 12" sizes. Smoothfoam is a great base for a multitude of projects because it can be easily shaped, sanded, painted and decorated to create three dimensional projects without the weight of other materials, like wood.
 
Here's How I Made It:
  • With a serrated kitchen knife, cut the 8" rectangle in two pieces - one 3" and one 5" for the Snow Baby.  Cut the first 12" rectangle in three pieces - one 3", one 4" and one 5" for the Snow Momma.  Cut the second 12" rectangle in two pieces - one 7" and one 5" for the Snow Daddy. 
  • Then carve all of the edges off of each piece of foam to create a rustic look.  The Smoothfoam bits will get everywhere, so I did this outside over a trash can.
  • Now the Smoothfoam won't be so smooth after this step, but the amazing part about this foam is that when rubbed together is sands itself!  Using one piece of Smoothfoam as a sanding block, rub your pieces together to smooth out all of the surfaces - amazing!
  • Paint all of the pieces with Raw Umber Americana acrylic paint from DecoArt and let dry.
  • Paint all of the pieces with Weathered Wood medium from DecoArt and let set for at least one hour.
  • Paint all of the pieces with a combination of half Light Buttermilk and half Bleached Sand Americana acrylic paint from DecoArt and let dry to create a crackled finish.
  • Decorate your Snow Family with button eyes, scrap paper carrot noses and black seed bead mouths.  Snow Baby received decorative buttons and ear muffs made from pom poms and a chenille stem.  Snow Momma received a Lamp Black painted hat with ribbon and holly trim, a scalloped paper collar and green buttons.  Snow Daddy received a Lamp Black painted top hat with craft foam brim, ribbon and snowflake trim, a paper bow tie and red buttons.
  • Use simple toothpicks to attached the Smoothfoam blocks together for a finished display! 
Now make sure to click on the DCC link in my right sidebar to hop through and see the other DCC designers projects using Smoothfoam, as well as, a chance to enter to win a prize package from Smoothfoam consisting of the snowman kit below and more!


To enter to win, leave a comment about their favorite projects on the designer’s blog and say what you would make with Smoothfoam. The more often you comment the more chances you have to win. All the projects will be posted on Pinterest, so readers can comment there too. The winner will be announced on our Facebook Page at  http://www.facebook.com/DesignerCraftsConnection on November 19th.

Thanks for stopping by!  -Beth

Monday, November 5, 2012

DESIGNER CRAFT CONNECTION - FIRST MONDAY IN NOVEMBER

This month's theme is THANKFULNESS!
 
I cannot believe that another year has almost come and gone!  I have alot to be thankful for this year - I am heathly and surrounded by a loving family and wonderful friends, so I considermyself lucky as well!
 
Since both sides of my family get together for a big meal every Thanksgiving, I always like to make some kind of interactive project - a centerpiece or a banner - that brings everyone together and gives us the opportunity to reflect upon what we are all thankful for.
 
This year I have created a THANKFUL BANNER and each family member can write on a leaf what they are thankful for!
 
 
Here's How I Made It:
  • Gather a variety of Autumn themed patterned papers and embellishments.  All of the supplies that I used were items that I already had on hand!  Most were from a Making Memories kit that I purchased at Michael's several years ago.
  • Sketch out 4 or 5 different leaves on to cardboard, then traced them on the patterned papers and cut out with scissors.  You can also use a die and a die cutting machine if you have one.
  • I crumpled all of my leafs, then flattened them back out and inked them with Tea Dye Distress Ink by Ranger.
  • Cut a section of ribbon the same length as the banner you want to make, then sew the leaves on to the ribbon with a sewing machine.
  • Spell out the word THANKFUL in chipboard letters - mine had a brown velvet finish and I added colored, self adhesive pearls to make them stand out.
  • Decorate the rest of your banner with the variety of embellishments you have gathered - I used glittered swirls, fabric covered brads, felt pumpkins and acorns, along with colored pearls and rhinestones.  Some of my embellishments were self adhesive, but for the others I used Aleene's Tacky Glue from iLoveToCreate - I just LOVE that glue!
I will hang mine on the mantle on Thanksgiving Day and each family member can write their Thankful Message on a different leaf with their name and the date.  This will become a Family Keepsake that I am sure will adorn my mantle for many years to come!
I hope you enjoyed my project today!
 
 
To view all of the other projects from the rest of the Designer Craft Connection group please use the HOP FORWARD and HOP BACK navigation in the DCC Icon in my right hand tool bar and ENJOY!
Thanks for stopping by! - Beth


Thursday, November 1, 2012

THANK YOU!

I would like to THANK everyone that voted for my Faux Metal Pumpkin in Plaid's 3rd Annual Trick your Pumpkin Contest - I came in Third Place!


Thanks for stopping by!  -Beth

Tuesday, October 30, 2012

CRAYON MELT ART PUMPKIN

Having seen crayon melt art all over Pinterest on everything from Mason Jars to Canvases, I wanted to try this technique on a Foam Craft Pumpkin.


Here's how I made it:
  •  Purchase a Foam Craft Pumpkin of your choice at your local craft store - I selected a small white pumpkin from Michael's.
  • Gather crayons - I used reds and oranges - unwrap the crayons and break into approximately 1" long pieces.
  • Place your pumpkin on a base of newspaper or an old catalog.  NOTE:  I use mail order catalogs for these types of messy projects and they make great paint palettes as well - just start in the center and peel off the pages as you use them!
  • Glue the pieces around the stem of the pumpkin with Aleene's Original Tacky Glue from iLoveToCreate - I love this glue and use it for everything!
  • Most online tutorials used a hair dryer, but I used my Inkssentials Heat It Craft Tool from Ranger.  Once the crayons began to melt I used a pair of craft tweezers to rotate and move the melting pieces of crayon around the top of the pumpkin to get complete coverage.
  • I let the first coat of red crayon dry and then repeated the process with orange crayon. 
  • Make sure that you don't hold the Heat It Craft Tool too close to the pumpkin or all of the colored crayon wax will melt away and form a puddle at the base of your pumpkin.  When this happened to my project, I peeled the extra crayon off the bottom of the pumpkin and re-melted it around the top.
A quick and easy craft - peeling the paper off the crayons took the longest!  Entire project took 10 minutes.

I love how this turned out, so I'm going to try it out with the kiddos tomorrow!

Thanks for stopping by!  -Beth

Sunday, October 28, 2012

EDIBLE MONSTER EYES

I made these at Christmas with chocolate Kisses and peanut butter M & M's and thought they looked like eye balls.


For Halloween I bought the white candy melts from Wilton and upside down chocolate chips for the pupils, then sprinkled red jimmies for the blood-shot Monster look.

I think they turned out great!  And they taste great too!

Then I tried some different color combinations and green eyes with orange jimmies were the most Monster-rific!


These are quick and easy to whip up with just a few ingredients and make great party favors and Teacher gifts.

Just pre-heat your oven to 200 degrees, layout parchment or waxed paper on a cookie sheet, line up your pretzels and top each one with a colored Wilton Candy Melt.  Place in oven for 5 minutes, remove and sprinkle colored jimmies on each cany melt, then press a chocolate chip in the center of each cany melt.  Let set for 30 minutes then store in an air tight container for up to 7 days.

Thanks for stopping by! - Beth

Thursday, October 25, 2012

PLAID'S 3RD ANNUAL TRICK YOUR PUMPKIN CONTEST

While on Facebook recently I noticed the announcement of Plaid's 3rd Annual Trick your Pumkin contest and decided to enter.


I started out with a $2.50 pumpkin from the discount section of Target and since it had specifically marked sections I wanted to create a pattern.  I drew a swirl pattern on every other section of the pumpkin with Martha Stewart Craft Fine Tip Top and Paint in Wedding Cake, then let it dry completely.

I decided that I wanted a metallic finish, so I grabbed my bottle of Martha Stewart Craft Paint in Pure Platinum.  I was not sure how well the paint would cover the plastic pumpkin, but it was completed covered in 2 coats and dried quickly!


To finish my pumpkin I rubbed on a coat of Martha Stewart Craft Paint in Beetle Black with a damp paper towel, then rubbed off the excess and was left with a faux metal finish!  You can add additional layers of black paint for a more distressed finish.  I applied 2 layers on my pumpkin below.


I want to try this finish on more pumpkins with different patterns and metallic finishes!

Thanks for stopping by! - Beth

Tuesday, October 16, 2012

DESIGNER CRAFTS CONNECTION - MAKIN'S CLAY BLOG HOP

Makin's Blog Hop Prize
13 of my fabulous Designer friends are participating in a Blog Hop featuring projects created with Makin's Clay. 
 
Just Hop through each of the 13 participating Designers Blogs by clicking on the HOP FORWARD or HOP BACK links on the DESIGNER CRAFTS CONNECTION navigation button on my right tool bar - Then, if you would like a chance to play with Makin’s Clay, make sure you visit the Makin’s Clay® Blog and let them know which project was YOUR favorite!
 
Now, for the fun part!

Makin’s Clay is offering a price package (pictured above) valued at just over $111.00 with products including clay, tools and a Memory Frame Kit. 

Remember, to enter leave a comment on the Makin’s Clay® Blog telling them which project you liked best on the blog hop. 

The winner will be randomly drawn from all entries on or about October 24th. 

They will announce the winner on the Makin’s Clay® Blog, so please check back on Thursday, October 25th to see if you have won!

Thanks for stopping by!  -Beth

Wednesday, October 10, 2012

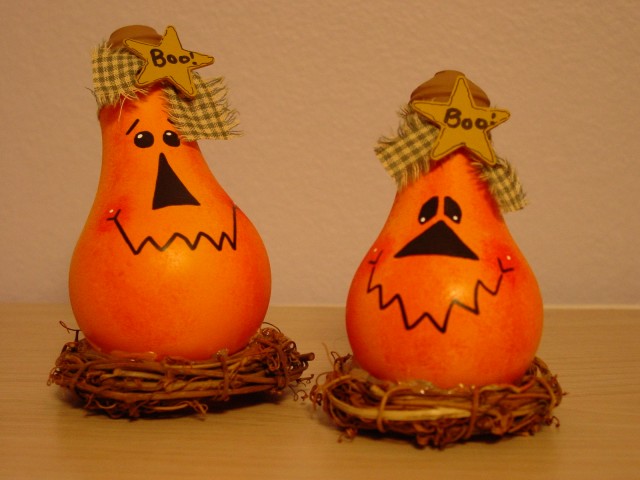
LIGHT BULB JACK-O-LANTERNS FEATURED OVER AT TOTALLY GREEN CRAFTS

I wanted to share a link to Suzy's blog www.totallygreencrafts.com because she is featuring my "totally green" Light Bulb Jack-O-Lanterns that I originally posted here   Check out her blog because she has tons of great recycled crafts and tutorials!


Thanks for stopping by! - Beth

Sunday, September 30, 2012

DESIGNER CRAFT CONNECTION - FIRST MONDAY IN OCTOBER

CRAFTING FOR HALLOWEEN

I wanted to challenge myself this month to create a project without purchasing any new supplies, so I pulled out my Halloween craft bin and dug through its contents to get some inspiration.  Having seen quite a few feather wreaths on Pinterest recently, I selected black feather boas and some simple wooden shapes from my stash.

I started with a 12" Styrofoam Wreath form from Dow and wrapped four 6' long feather boas around the form, securing with Aleene's® Original Tacky Glue™.

I wanted a uniform look, so I painted all of the wooden shapes with Americana Paint from DecoArt in Canyon Orange.  For some extra sparkle I painted a Twinkle Sparkle Top Coat in Orange.

For the green glitter accents, I base coated some mini Styrofoam Balls with Aleene's Tacky Glue and rolled them in Bright Green Glitter.

Once all the shapes are dry, glue in place on the Wreath Form with Tacky Glue.  Cut a 20" length of orange fiber and secure one end to the back of the shape on the wreath and the other to the back of the spider shape.

The possibilities for this type of project are endless.  Use your imagination and the supplies around your home - or visit your local craft store and purchase these readily available craft supplies.


I hope you enjoyed my project today.  To view all of the other projects from the rest of the Designer Craft Connection group please use the HOP FORWARD and HOP BACK navigation in the DCC Icon in my right hand tool bar and ENJOY!

Thanks for stopping by! - Beth

Monday, August 6, 2012

DESIGNER CRAFT CONNECTION - FIRST MONDAY IN AUGUST

CRAFTING WITH SCHOOL SUPPLIES

For the month of August our Designer Craft Connection challenge was to craft with school supplies.  This is very timely since the kids in Southwest Florida go back to school this Wednesday August 8th!  Open House was Saturday and after my Niece, Marlee, met her new Third Grade Teacher, she decided she wanted to make her something for the first day of school.  What better to give a teacher then a pencil holder for her desk - and what better to craft it out of then pencils!


Here's How I Made It:
  • I already had a tall, square shaped container in my stash that was left over from some fancy Holiday candies, so we painted it inside and out with Golden Straw Yellow with Ameicana paints fom DecoArt to match the pencils and got to work. 
  • Measure from the top to the bottom of your container with a ruler and mark each pencil at that length. 
  • I cut all of the pencils with my pair of pruning shears from Fiskers - this worked perfectly and gave us nice, clean cuts (using sharp cutting tools is something that children should get help with from an adult). 
  • Turn the container on its side and apply a generous coat of  Aleene’s® Original Tacky Gluefrom I Love To Create
  • We used 11 pencils on 2 sides and 10 pencils on the other 2 sides. 
  • Allow glue to dry and secure a ribbon around the center, tied in to a bow. 
  • Marlee is going to add a tag with her teacher's name and some school themed stickers then fill the pencil holder with - you guessed it - brand new pencils!
We decided to have all of the erasers at the top, but you could have the erasers at the bottom, alternate top and bottom or create a personalized pattern of your own.  This project would also work well with rulers or even colored pencils for your Art Teacher.  Imagination and creativity are the keys when crafting with kids!

I hope you enjoyed my project today.  To view all of the other projects from the rest of the Designer Craft Connection group please use the HOP FORWARD and HOP BACK navigations in the DCC Icon in my right hand tool bar and ENJOY!

Thanks for stopping by! - Beth

Monday, May 14, 2012

TEACHER APPRECIATION WEEK


Teacher Appreciation Week is this week in our schools and this past weekend my Niece and I made these cute, quick and easy Apple Pots for her teachers.

  • Paint a terra cotta pot and saucer with Country Red Americana Paint from DecoArt and let dry. 
  • Paint a wooden spool with Chocolate Brown, let dry. 
  • Paint a large "squiggle" in Pistachio Mint, let dry - then paint stripes in Victorian Blue to create your "Worm". 
  • Outline your Worm and draw in his/her face with a Black Sharpie Marker.
  • Lightly letter your saying - Grade A Teacher - in pencil then fill in with the Black Sharpie Marker.
  • Spray entire "Apple" - inside and out with Matte Spray Sealer from DecoArt, let dry.
  • Glue a silk leaf and the painted spool to the top of your terra cotta saucer "lid" with Aleene's Original Tacky Glue from I Love To Create, let dry.
Fill with a sweet snack or maybe a gift card and say THANK YOU to your favorite Teacher this week!

Thanks for stopping by! - Beth

Monday, May 7, 2012

DESIGNER CRAFTS CONNECTION - FIRST MONDAY IN MAY


This month's DCC post is all about quick and easy jewelry projects which fits in great because Mother's Day is this coming Sunday May 13th!

I always like to make handmade gifts with my Nieces and Nephew, so they have something special to give to their family members on special occasions.

I love the Start-Ups line of embellish-able (is that a word?) charms from Buttons Galore and More, they make the perfect blank canvas.  We started with the Large Tags because I thought they were the perfect size for a necklace pendant.  We haven’t used Alcohol Inks in a while, so I pulled those out and we decided on Greens, Blues and Purples.  The Alcohol Inks dry instantly and the ink is heat set in just about a minute, so creating these charm necklaces is a quick and easy process with virtually no mess, which is important when crafting with kids!
The first background we created was a tie dye effect – the alcohol ink has a fluid movement on the Start Ups surface and the kids almost couldn’t stop layering the colors and watching them blend together! We added a chipboard butterfly from K & Company and Making Memories letter stickers to spell the word FLY because Grammy LOVES Butterflies!

For the next background, we dropped Alcohol Ink on the surface of the Start Ups, then blotted off with a paper towel to create a watercolor effect.  We stamped over the background with StazOn Jet Black Ink and set the ink with a Heat Tool.  We added a touch of Starlight Stickles on the dragonfly, the word sticker COURAGE, a flower with gem and a black gingham ribbon compete this necklace for their Mom, because she is starting a new job this week!

The third background was similar to the second, but we sanded the dry alcohol ink to distress the finish.  Then we stamped with musical notes and finished with a large monogram M that was painted black and topped with a thick coat of Glossy Accents for Grandmom because she loves music and her name is Matilda!

We inked around the edge of each of the Start Ups charms with black StazOn ink and then set it with a Heat Tool.  I ALWAYS have the kids print their initials and the date on the back of each of their projects, so they become a treasured keepsake.

Add a jump ring and some ball chain and our Mixed Media Charm Necklaces are ready to give as Mother's Day gifts!

Please use the DESIGNER CRAFTS CONNECTION navigation on the right sidebar to hop around to the other Designers on our web ring and view the creative projects that they have posted for May!

Thanks for stopping by! - Beth