Monday, May 19, 2014

MAY FLOWERS Hydrangea "Chandelier" Tutorial


May is here and so are the colorful flowers everywhere.  I have always LOVED hydrangeas, so having the chance to work with the Borders & Hydrangeas die by Eileen Hull was a dream come true.  Now I can enjoy my hydrangeas all year round with this cute "chandelier".

Materials:
Sizzix Bigz Die by Eileen Hull - Borders & Hydrangeas
Sizzix Bigz Die by Eileen Hull - Ribbon 3-D
Sizzix Bigz Die by Eileen Hull - Leaves
Sizzix Big Shot Machine
Smoothfoam balls - 3" (1), 2 1/2" (1) and 2" (1)
Americana paint by DecoArt -Purple Cow
Cardstock - four shades of purple, two shades of pink and three shades of green, paper trimmer, ribbon 8" (3), pearl head straight pins, paint brush, mouse pad, Tonic Paper Piercing tool, wooden skewers (3)

Instructions:
1.)  Insert skewers in Smoothfoam balls and paint with Purple Cow, let dry by placing in a cup or glass.

2.)  Trim four shades of purple cardstock to fit just the hydrangea section of the Borders and Hydrangea die (2 1/2" by 6") and die cut.  Repeat with three shades of green cardstock and Leaves die (5" by 6") and die cut.  Repeat with two shades of pink cardstock and Ribbon 3-D die (6" by 6") and die cut.  This is a good way to mix and match and use up your scraps!

3.)  Turn mouse pad upside down on work surface.  Lay out hydrangea flowers and using the rounded end of the piercing tool or paint brush handle, rub a circle in the center of each flower.  This will give the flowers shape.

4.)  Layer hydrangea flowers (two at a time) and secure with pearl head straight pin.  Repeat until all three Smoothfoam balls are covered. 
  

5.)  Fold each section of ribbon in half and secure with straight pin to top of 3" ball.  Repeat and connect all three balls. 
  

6.) Fold bow section of Ribbon 3-D die in thirds and thread on to a straight pin, trim stem from leaves and thread on to the pin then insert in to the top of the largest foam ball.  Repeat with the middle and smallest foam balls.


Hang and enjoy!


If you would like to enter this month's challenge, here is the information.


You could win an awesome PRIZE!


The Art with Heart Challenge is a monthly celebration of creativity!  Each month the Inspiration Team will be showcasing their Art with Heart created with Eileen Hull’s innovative Sizzix dies. They will be following a broad theme left entirely open to creative interpretation.  We invite you to play along with us and share YOUR art with heart!

We want this to be a place for everyone to create, inspire and share.  We would love to see what you can do with Eileen Hull’s fabulous products but this is not a requirement.  Use what ever products your artful “heart” desires.  Art is for everyone so come along and share your Art with Heart!

We want you all to create freely there are no rules here, just a few simple guidelines…

1.) Create a new project following the Art with Heart Challenge Theme (however you interpret the theme) OR if you have created something that fits the theme previously create a new post with a photo and link to the original post.  

2.) Include a link to the current Art with Heart Challenge in your post so others can play along too!

*Buttons and graphics are available for you to display in your sidebar if you would like to help us spread the word :)

3.) When linking up your project please include a direct link to your post.

4.) You are not required to use Eileen Hull Products in your projects.  However, those who do use Eileen Hull products will be given two entries into the prize draw.

That’s it!  So get going, get creative and share your Art with Heart!

Be sure to come back each week on Tuesday to see more creative project ideas from the Inspiration Team and check out the latest entries in the challenge.

Now it’s your turn to share some inspiration by sharing YOUR creations!  You have until May 29, 2014 to link up your projects HERE! for a chance to win the Eileen Hull Picket Fence die as a prize.  The winner and Top 3 will be announced on May 30, 2014.  

In the meantime the Inspiration Team will be bringing you more creative projects and inspiration every Tuesday on Eileen's Blog HERE!  

I can’t wait to see your Art with Heart!

Thanks for stopping by -Beth


Monday, May 12, 2014

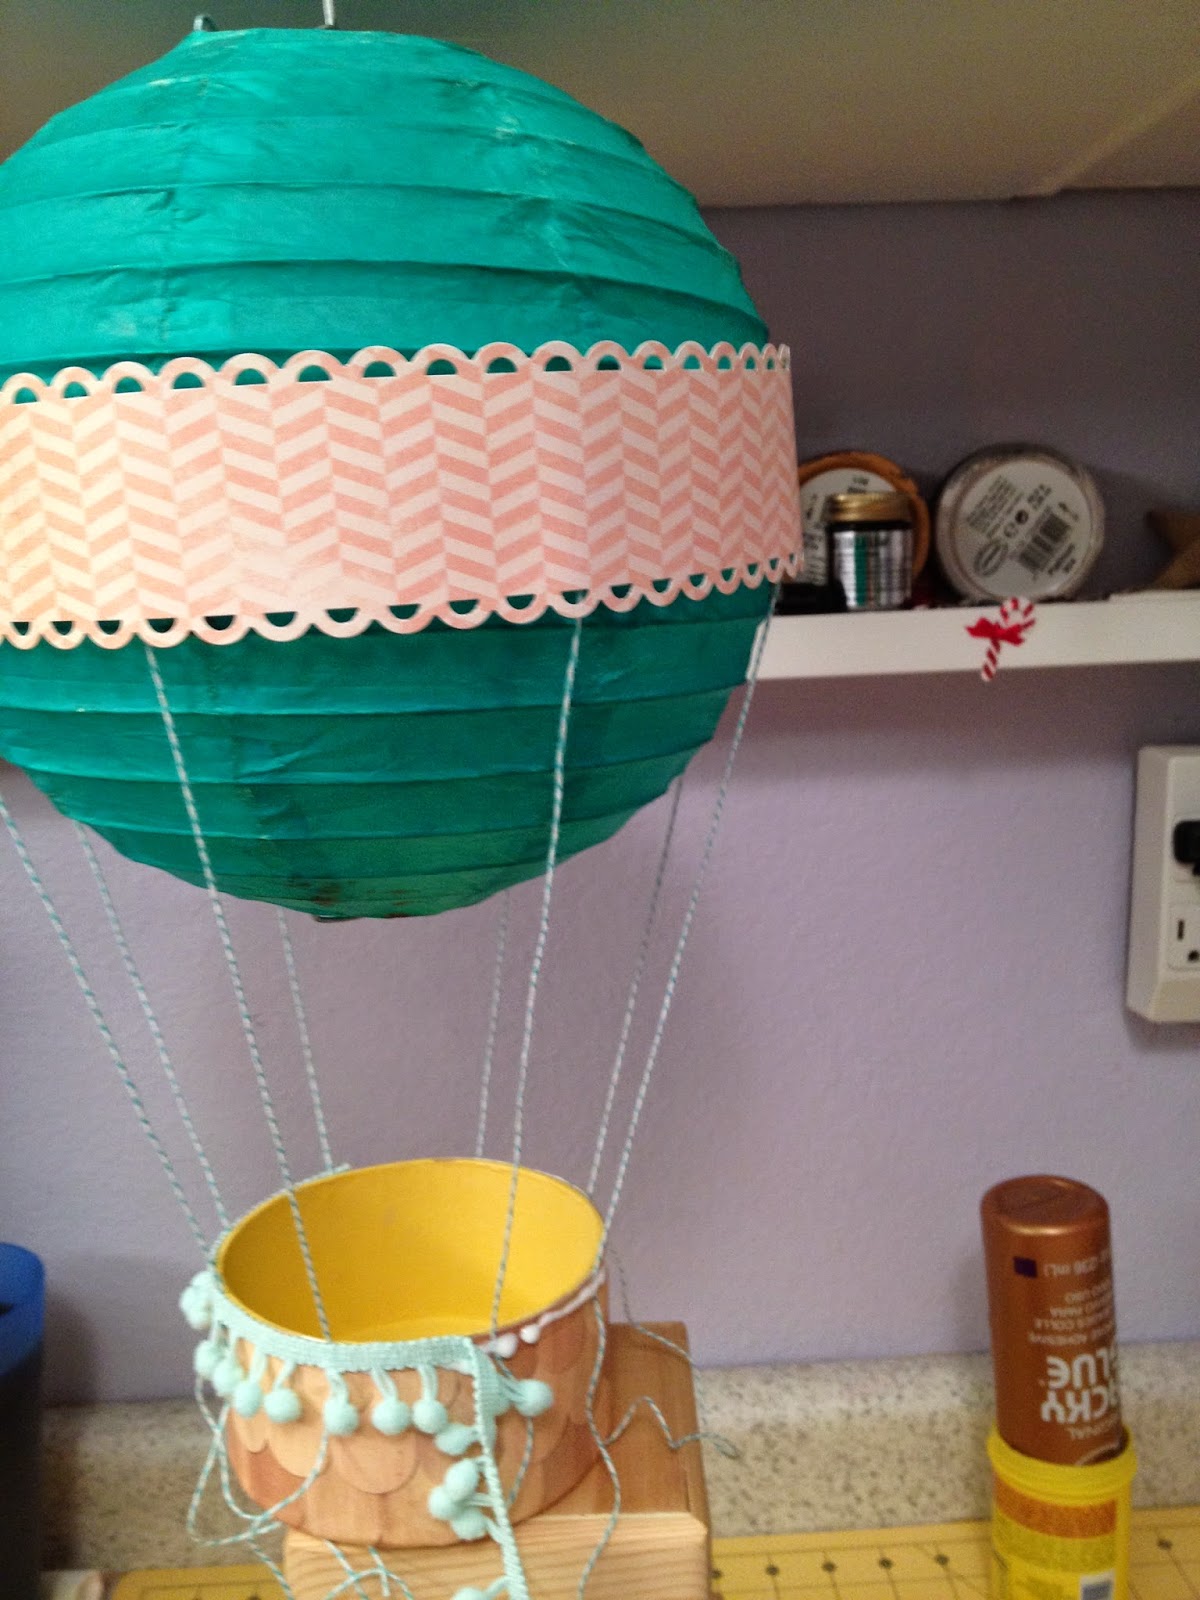
Hot Air Balloon Tutorial


I have had this idea for a Hot Air Balloon "floating" around in my head for a while now, but only recently had the opportunity to actually create them.  It all came together quite nicely - I had a Design Team project assignment for Whim So Doodle, so I received these great papers and embellishments from the Oh, Darling! line by Crate Paper AND I found these (originally white) paper lanterns in two sizes from the Dollar Bins at Michael's - KISMET!  

Materials:
  • Crate Paper - Oh, Darling!  Papers, Stickers and 3D Embellishments.
  • Americana Paints by DecoArt - Moon Yellow, Coral Rose and Indian Turquoise.
  • Aleene's Original Tacky Glue by I Love To Create.
  • Art Anthology - Colorations Spray Mists in Peacock, Timeless and Paprika.
  • Golden Soft Gel Medium Matte.
  • Hazel & Ruby - Assorted Sequins in Pinks.
  • Paper Lanterns - 8" (1) and 4" (2).
  • Paper Mache Box Bottoms (3).
  • Bakers Twine, Ball Fringe (pink & blue), Lace Trim (pink).
  • Border Punches by Fiskars - Threading Water, Bracket and Scallop.  Regular Punches by Martha Stewart - 1" Circle, Starburst, Flower and 1" Square.
  • Flowers, Rhinestones, Pearls, Buttons, etc.
  • Double sided adhesive, paint brush, pencil, ruler, paper trimmer and scissors.

Here's how it made it:

1.)  Pop up the paper lanterns and lock in place.  Tint lanterns with spray mists.  I found that the Art Anthology mists covered the best and had the most vibrant color when dry.  Paint the inside of the paper mache box bottoms, let dry.  Measure and cut paper to fit around edge and on bottom of paper mache boxes.  Attach with Gel Medium, let dry. 


2.)  Measure, cut and punch strips of paper to fit around center of balloon.  Attach 8 lengths of baker's twine to inside of strip with Tacky Glue, let dry.  Adhere paper strip to center of balloon with double sided adhesive tape, press gently to secure.  Adhere baker's twine strings to sides of balloon basket with double sided tape.  Glue ball fringe around edge and trim twine.  Glue remaining pieces of twine to top half of balloon.

3.)  Embellish balloons with Oh, Darling! stickers, mini flowers, punched flowers, punched shapes, buttons, rhinestones and pearls as you like.


4.)  Cut out little girls from the Oh, Darling! papers and glue to inside of balloon baskets.


5.)  Create flag for top of balloon using a wooden toothpick, Oh, Darling! paper and letter stickers.


6.)  Place blonde girl Oh, Darling! 3D Sticker in the large balloon basket.


7.)  Since balloons will be hanging, embellish bottom of balloon baskets with Oh, Darling! 3D Stickers!


The possibilities are endless with the color palettes and themes that can be created - GO WILD and FLY HIGH!

Thanks for stopping by!  -Beth

Saturday, April 19, 2014

Easter Banner featuring EZ -De's Clear Stamps & Crafter's Ink by Ann Butler Designs


Easter is almost here, but today I wanted to share a quick and easy banner made with supplies from Ann Butler Designs!

Materials:
~ EZ-De's Easy Design Elements by Ann Butler Designs for kellycraft - 2" Tri Triangles Set: A; 2" Checkered Woven Hearts; Flourish 2" ABC's.
~ Ann Butler Designs Crafter's Ink for ColorBox in Lilac; Tangelo; Limelight; Berry; Sunshine; Aquamarine.
~ Tombow - Xtreme Permanent Adhesive Runner; Power Adhesive 3D Tabs 1/2" by 1/2" square.
~ Buttons Galore & More - seven assorted Buttons.
~ Cardstock in Light Orange; Dark Orange; Bright Green.
~ Ruler, Scissors, pinking shears, yellow ribbon 48", craft foam, baby wipes, towel, acrylic stamping block and 2" circle punch.

Here's how I made it:

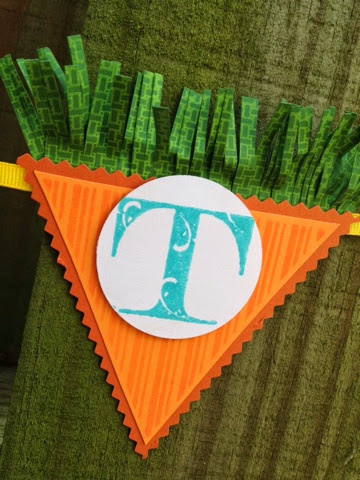
1.) Stamp Striped Triangle on light orange Cardstock with Tangelo ink, six times.  Cut out and attach to dark orange Cardstock, then trim with pinking shears.  To get a solid stamped image each time, layer a sheet of craft foam under your paper.


2.) Stamp Checkered Squares on bright green Cardstock with Limelight ink, making three rows of six squares.  Cut each row out, then in half. Cut fringe on each rectangle and attach to each carrot top. 

3.) Stamp the word EASTER using Lilac, Berry, Sunshine and Aquamarine inks.  Punch out with 2" circle punch.  


4.) Attach stamped letters to carrots with 3D Adhesive Tabs.  Attach carrots to yellow ribbon with Xtreme Permanent Adhesive Runner.  Attach buttons to ribbon with 3D Tabs.

5.) Hang and enjoy!!


Thanks for stopping by! - Beth

Sunday, April 13, 2014

Rebekah Meier Designs Stencil Blog Hop - The Crafters Workshop


I was excited to see my crafty friend Rebekah Meier launch a new line of stencils with The Crafter's Workshop at CHA 2014. 
 
Here is some insight in what inspired Rebekah to create these stencils:
 
"Most of my stencils are collage in style.  Collage being my favorite medium, whether in paper, fabric or both combined.  My other stencils are inspired by circles and Mandalas (I love the art form) designs.  Mandalas for those not wanting to draw their own.  I sent four 6" mandala inspired stencils to nine of my creative friends.  Be sure to visit each of their sites, I can assure you each designer's creation will be awesome, unique and varied in their mediums.  I can't wait to see what they come up with."


Materials & Supplies:
Here's how I made it:

Decoupage Tissue Wrap Melange to each canvas using Golden Soft Gel Medium, set aside to dry.  Spray Repositionable Stencil Spray on back of each stencil and attach to canvas.  I positioned mine off the edge to create interest.

 Randomly spread Golden Molding Paste over surface of stencils.
 
 Covering entire surface of each canvas completely.
 
 Immediately, peel back the stencil gently.  Wash stencil off with warm water.  Set canvases aside to dry completely.
 
 Place a small amount of Winter Blue on paper plate and dilute with water. Brush randomly over top surface and sides of each canvas.  Remove excess with paper towel.
 
 Repeat with Slate Grey paint, let dry.
 
 Repeat with Neutral Grey paint, let dry.
 
Final coat is with Charcoal Grey paint.  Make sure to get into recessed areas, let dry for a few minutes, then remove excess paint from surface with paper towel.
 
 One Canvas One, highlight areas with Liquid Perfect Pearls using the tip of your index finger to spread on to surface randomly.  I love the shimmer that this step gives the canvases - it looks like metal showing through!
 
 Repeat on Canvas Two...
 
 Canvas Three...
 
 And Canvas Four...
 
Once dry, apply grey ribbon to canvas edges using Tacky Glue to secure.

I love working in mixed media because there are no rules and there are no mistakes!  If you don't care for the way one of your canvases looks, then just paint over that area and start again - LOVE IT!
 
Please click on the links below to see what the other Designers have created with Rebekah Meier Designs Stencils!


Friday, April 11, 2014

ANOTHER BIG ANNOUNCEMENT!!

Just stopping by on this lovely Friday afternoon to share my BIG NEWS that I was invited to join the KUNIN DESIGN DREAM TEAM! 

Head on over to the Kunin Group website to discover all of the yummy felt, fabrics and crafts that they have to share!

My first project is Funky Flower Pin that is cute, quick and easy to make - check it out HERE! on the Kunin Felt Blog.  Their FB Page has tons of inspiration as well!


Can't wait to share the rest of the projects that are swimming around in my head just waiting to be created!

Thanks for stopping by!  -Beth

Monday, April 7, 2014

Easter Egg and Basket Tutorial


Today is the first Monday in April, so the Designer Crafts Connection is having their monthly blog hop!  This months theme is "April Showers Bring May Flowers!"  Instead of a traditional flower themed project, I took some creative license and have created my project with flower themed papers and embellishments.

Materials:

  • 8" Round paper mâché box bottom.
  • Smoothfoam Eggs - one at 3 1/2", two at 2 7/8" and four at 2 5/16".
  • Golden Soft Gel Medium, Paint Brushes.
  • Basic Grey - Fresh Cut - Flower Kit; Violet Garden; Gardenia Row; Daisy Patch; Poppy Lane; Vellum Tape Strips.
  • Echo Park - Hippity Hoppity - Hippity Stripe; Easter Bunny; Hoppity Journaling; Sticker Accent Pieces.
  • Jillibean Soup - Kraft Hexagons (2).
  • Maya Road - Vintage Lace Tape in Antique Pink.
  • Rhinestones and Pearls - White, Golden Yellow, Light Green and Lavender.
  • Ranger Ink - Distress Ink Pad in Antique Linen and Dylusions Ink Spray in Lemon Zest.
  • Score Tape - 1/4" Double Sided Tape.
  • Scissors, Paper Trimmer, Craft Knife, Ruler, Pencil, Paper Shredder, Junk Mail, Tacky Glue.

Here's how I made it:


Cover the bottom of an 8" round paper mache box with teal decorative paper.  Crumple and distress with RANGER INK Antique Linen Distress Ink Pad, several decorative papers, then tear and decoupage onto SMOOTHFOAM Eggs with GOLDEN Soft Gel Medium.  Allow to dry and decorate your eggs with BASIC GREY and ECHO PARK stickers, borders, washi tapes, rhinestones and pearls.


Cover basket with hexagon kraft paper to give a woven basket look.  Trim a row from the hexagon paper, measure the width of the inside of the hexagon and cut a strip from the teal decorative paper.  Weave the teal paper through the hexagon paper and attach to the inside of the basket.  (note: this is a decorative handle only)  

Embellish basket with BASIC GREY Fresh Cut Flower Kit and ECHO PARK Hippity Hoppity Sticker Accents.  I needed yellow Easter grass for this basket, but did not have anything yellow I could use, so I took a handful of junk mail from my paper shredder and tinted it using RANGER INK Dylusions Ink Spray in Lemon Zest.  Worked like a charm!

I hope you have enjoyed my non-traditional flower themed post!


Now it is time to HOP around to the other Designers Blogs and see what FLOWER inspired projects they are going to share with us - I know I can't wait!  Use the HOP FORWARD and HOP BACK links in the DCC icon on the right sidebar to navigate!

Thanks for stopping by! -Beth