Friday, March 14, 2014

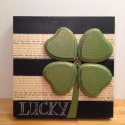
Craft Attitude Lucky Shamrock Canvas


A BIG Thank You goes out to Jonathan Fong for asking me to participate in the Craft Attitude St. Patrick's Day blog call. I had never worked with Craft Attitude before but blown away by its versatility!  Craft Attitude basically lets you print any copyright free image on the film with an inkjet printer and then apply it to any surface. The possibilities are endless!

Craft Attitude for Scrapbooking 

12" x 12" wooden canvas by Walnut Hollow
Heart plaques - four
Americana paints by DecoArt lamp black and dazzling metallic brilliant green
Golden soft gel medium
Pencil, Ruler, paintbrushes, computer, word processing software, Inc. jet printer, scissors, white chalk pencil, chipboard, green rhinestone, painters tape, craft knife, Lattice digital image and Irish Blessing.


Here's how I made it!

I wanted to test out several green paint options with different green patterns over top and created this tag, so I could make my selections.  I also tried out several application options, but liked the adhesion and finish of the Golden Soft Gel Medium the best.  I suggest doing some testing before you start your project.


Measure off your 12 x 12 wooden canvas and a 2 inch section, a 3 inch section, a 2 inch section, 3 inch section, and 2 inch section.  Apply painters tape and paint top middle and bottom stripe with lampblack, Let dry. Paint for heart shaped plaques and chipboard with brilliant green metallic, Let dry. 


Using word processing software on your computer type Irish blessing of choice, Reverse the copy that is backwards and print two sheets and landscape of your Craft Attitude on your inkjet printer following the instructions on the package.   Download lattice pattern from web and print two sheets on Craft Attitude.


Measure and cut four 3 inch wide by 11 inch wide strips of Irish blessing Craft Attitude and apply to raw wood on Canvas with soft gel medium. Burnish with bone folder to remove all air bubbles and wrinkles.  Piece together your Craft Attitude strips on the right side of the Canvas. Apply topcoat of gel medium over entire Canvas surface, let dry. 


Rough-cut a heart-shaped from Lattice printed craft attitude with scissors approximately 1 inch wide larger then plaque. Apply gel medium to surface of plaque then apply craft attitude according to package instructions. Burnish with bone folder to remove any air bubbles and wrinkles then peel back liner paper. Cut slits around the edge of craft attitude.  Apply gel medium to edge of plaque and burnish down craft attitude to remove any air bubbles and wrinkles. Trim excess craft attitude from bottom of plaque. Repeat with remaining three plaques and 4" x 4" chipboard. Applied topcoat of gel medium to four plaques and chipboard, let dry. 


Cut stem and half inch circle from chipboard, Adhere to canvas with tacky glue.  Position for plaques on Canvas in the shape of a Shamrock attach with tacky glue.  Attach green rhinestone to circle in center of shamrock. Write the word lucky at the bottom of the canvas with white chalk pencil.

Now check out some other great St. Patrick's Day Craft Attitude projects by some of my Designer Friends!

THANKS for stopping by!  -Beth

BIG ANNOUNCEMENT!!!

I have been invited to be a part of the 
Eileen Hull Inspiration Team!


What a great honor to be a member of this team of talented designers headed up by Amy Bowerman of Plucking Daisies and the Artist on the Block!

I have had the pleasure of being friends with Eileen for about 6 years now and have been so excited to see her lines of dies be produced by Sizzix!  They are so clever and versatile that I am blown away by her creativity.  Eileen has also developed a line of stamps with Craffiti Direct and ColorBox Blends ink applicators with Clearsnap.

We have each been asked to share our three favorite projects we have made with Eileen's Scoreboard Dies from Sizzix!

The first project I would like to share is my Christmas House Stacked Boxes.  The Scoreboard Dies are able to cut thicker substrates like mat board, so the shapes are very sturdy.  I painted and stamped this cute house then shingled the roof with buttons!


The second project I would like to share is my Peace on Earth Wreath.  This project features the 3D Bird Die that I strung through the center of the wreath with wire and created a globe with a Smoothfoam ball.


The last project I would like to share is the Artist on the Block project that I created for Eileen's new Cherished line of Dies.  My snowman was on display in the Sizzix booth at the CHA Show in January.  Covered in lace and featuring a mini spindle carrot nose, he is one of my most favorite projects of all time!  Can't believe that I didn't get a better photo :(


More News:  The Art with Heart Challenge is a monthly celebration of creativity!  Each month the Inspiration Team will be showcasing their Art with Heart created with Eileen Hull’s innovative Sizzix dies. They will be following a broad theme left entirely open to creative interpretation.  We invite you to play along with us and share YOUR art with heart!


We want this to be a place for everyone to create, inspire and share.  We would love to see what you can do with Eileen Hull’s fabulous products but this is not a requirement.  Use what ever products your artful “heart” desires.  Art is for everyone so come along and share your Art with Heart!

Stop by Eileenhull.com to meet the Inspiration Team and share your Art with Heart, plus you will be entered to win a fabulous Sizzix Prize pack!

Thanks for stopping by!  -Beth

Monday, March 3, 2014

COLLAGRAPH PRINTING WITH DINA WAKELY

Hello March!  When the month comes in over the weekend, it always seems to sneak up on me!  Welcome to the Designer Crafts Connection MARCH BLOG HOP!  This month we are share new techniques that have blown us away!

Last month I had the opportunity to take a Collagraph Printing Class with Dina Wakely at Whim So Doodle, my local scrapbook (and more) store in St. Petersburg, Florida.  Dina is always full of energy and extremely inspiring, so I always jump at the chance to take her classes.  Creating in a group of other creative people always recharges my creative batteries!


Collagraph Printing is literally making a collage and turning it into a printing plate!  We used shipping tags, manilla file folders, stencils and molding paste, drywall tape, punches, craft foam - anything that will leave a slightly raised image will work.

The next step is to glue everything together and create the "plate".  We used shipping tags, scrap cardboard and manilla file folders.  I created several plates that day, but the one below using molding paste with a feather stencil gave me the best results.  Dina then suggested to "seal" the plate with several coats of gel medium, so the paint would not break down the fibers in the cardstock.  Another tip would be to use a heavier bodied paint like Golden or Liqutex rather than the regular craft paint that I had brought to use.  The paint is applied with a scraper or old credit card, then some of the paint is removed and a second color is applied.  Then you place your image on the paper and burnish with a rubber roller, or your fingers - it is up to you - whatever you think works best.  Dina prints in her art journal, but also uses regular white copy paper from the office supply store to print on.


I am excited to print some additional images from my first Collagraph Plate and to also create some more plates to use as images in my Art Journal, on Greeting Cards, or even as framed Art Work - the possibilities are endless!  See more of Dina Wakely's Collagraph Printing HERE on her blog!


Lastly, I am sharing a recent page from my Art Journal, something new an inspirational that I am doing this year - just for ME!

Now it is time to HOP around to the other Designers Blogs and see what NEW mind blowing techniques they are going to share with us - I know I can't wait!  Use the HOP FORWARD and HOP BACK links in the DCC icon on the right sidebar to navigate!

Thanks for stopping by! -Beth