Tuesday, January 7, 2014

FAUX LEATHER MASKING TAPE JOURNALS


Thanks for stopping by for the DESIGNER CRAFTS CONNECTION January Blog Hop!  This month's theme is new techniques.


I worked with these Gelatos from the Faber Castell Design*Memory*Craft line at the CHA Summer Show and then I picked some up in several different color families at Michael's to play with them.  I was looking around my studio for a surface and saw four rolls of masking tape that I had on hand from another project and thought that the tape would make a versatile surface.  I also had some small blank books on hand, so decided to create some colorful journals.


Here's how I made it:
  • Lay out several lengths of masking tape on a workable surface.  I used my Inksentials Craft Sheet from Ranger.
  • Next, just start scribbling - what fun!  I mixed and matched colors, then misted the maksing tape with water and blended with the paint brush included in the Gelatos Mix & Match set.
  • Keep layering and blending until you get the effect you are looking for. This was actually extremely fun and relaxing! Crafting as therapy - LOVE IT!  I blotted some strips with a paper towel and others with my paint brush, but I think that they all look like faux leather!

  • Once all of the masking tape strips are colored and dry, measure your book cover (or surface of your choice) and cut to length.
  • I used the widest strip of masking tape on the spine of the book, so I had enough to wrap around the front and back covers.  Cut a small "V" at the folds of the book and wrap the edges of the masking tape in on inside of the front and back covers.
  • Lay out different colors and widths of the colored masking tape until the front and back covers are completely covered.  Make the final piece of masking tape wide enough to wrap around the inside edge of the book.  Cut the tape at an angle, so the finished edge is as neat as possible.  Then burnish all surfaces with a bone folder (or old credit card) to smooth out and bubbles and create a good adhesion to the surface of the book. 
  • Using the Stamper's Big Brush Pen in Black I inked the clear stamps that came with the Gelatos Mix & Match set and stamped the Damask and Flower pattern on the front cover of my journal books.  I found that the stamping worked better on the masking tape if I lightly misted the stamp after I inked it with the Big Brush Pen.
  • The last step is to measure, cut and adhere a coordinating paper to the inside front and back covers to hide all of the tape edges and finish the Journal.

I am going to be giving out these mini Journals out this New Year to family and friends!  They are the perfect size to carry in your purse for important notes and ideas!


Now you can HOP AROUND and see what other new techniques the rest of the Designers are sharing with everyone today.  Just click on the HOP FORWARD and HOP BACK buttons in the DESIGNER CRAFTS CONNECTION icon on the right hand side task bar.  HAPPY HOPPING!


Thanks for stopping by!  -Beth

Monday, December 9, 2013

Cre8time this Christmas for Crafting with the Kids!

 Crafting at the holidays is always fun for me, but crafting with my Niece is even better!

Take time to CRE8TIME with your family this Holiday Season!

Crafting a flowered messenger bag from and American Girl kit!
 
Knitting a scarf with Gandmom!
 
Thanks for stopping by! -Beth

Monday, December 2, 2013

The 12 Ornaments of Christmas Past, Present and Future!

It's the first Monday in December, so that means that it is time for the Designer Crafts Connection Blog Hop!  This month's theme is Holiday Decorations! and Holiday Ornaments are kind of my "THING".  I am known for creating unique ornaments each year for my close circle of family and friends.  So, I wanted to share some of my recent creations as well as some oldies but goodies! 

Happy Crafting - I hope you enjoy!

 Simple paint brushed embellished with paint, decorative yarn and ribbon

Metal containers with clear lids filled with stickers and faux snow

Altered Altoids tin painted like a vintage television with wire and bead antennae

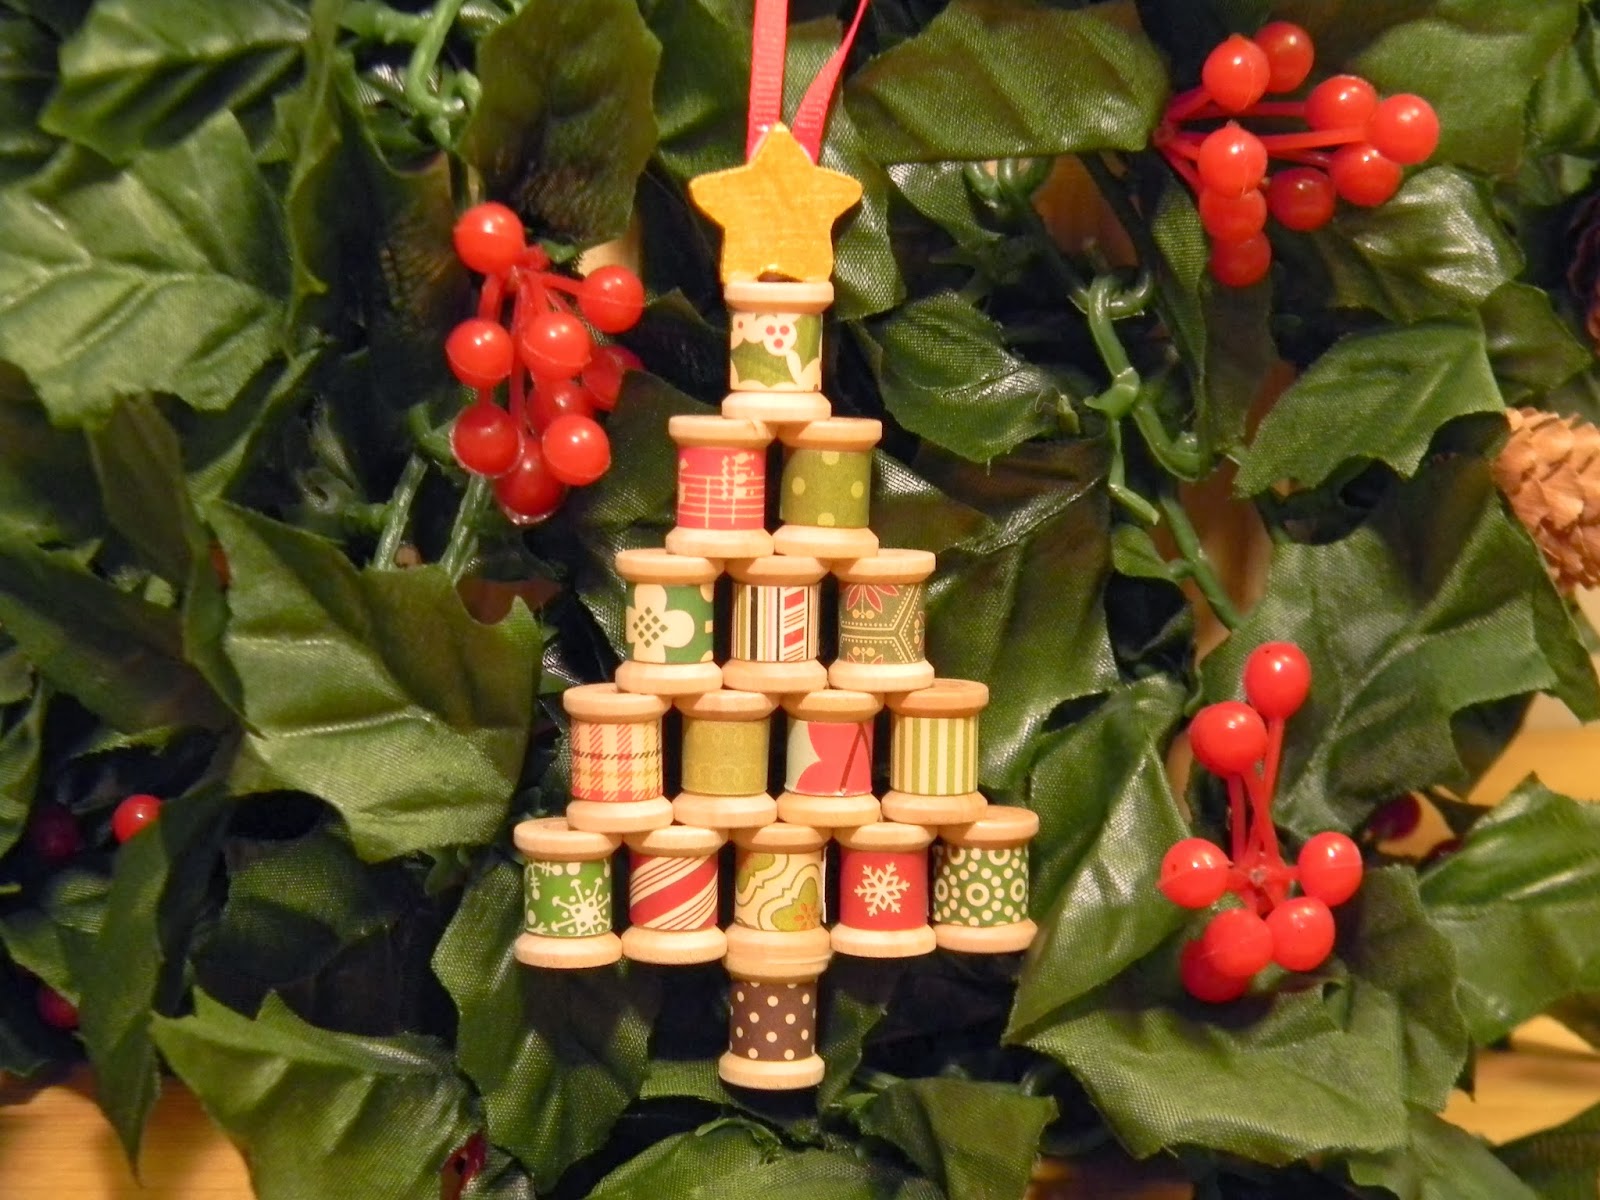
 Wooden spools covered with decorative scrapbook paper, stacked and topped with a gold star
 

Tan craft foam cut into cookie shapes and decorated with 3D Fabric Paint "icing"

 Simple satin ornaments from the Dollar Store glued into cupcake papers with 3D Fabric Paint "icing" and pom pom toppers
 
Wooden Gingerbread Man cut out embellished with stain and paint

Chipboard coaster stamped with a repeating Holly Leaf and embellished with rhinestones and ribbon

Miniature mittens filled with wooden ice cream spoon Snowman and Santa faces, embellished with buttons, ribbon and fabric

Wooden Sugar Plum Fairy cut out embellished with paint and glitter

Metal hinge upcycled with paint and gold marker

Metal hinge upcycled with paint and faux snow

 
Now you can HOP around to see what the other Designers have created with a Holiday Decorations theme in mind - I can't wait to see the creativity!  Just click the HOP BACK and HOP FORWARD buttons in the DCC icon on the right hand side of my toolbar!
Thanks for stopping by!  -Beth

Friday, November 15, 2013

Make a Christmas Ornament with Smoothfoam and The Robin's Nest

http://chatteringrobins.blogspot.com/2013/11/ornament-blog-hop.html

I am excited to be taking part in this Holiday Ornament Blog Hop sponsored by Smoothfoam and the Robin's Nest!

There are quite a few Designers participating, so be sure to hop on over to the Robin's Nest Blog for a complete list of projects and links!

My project today was inspired by my Gran, my maternal Grandmother, who was extremely crafty!


I started out by covering a Smoothfoam Ball 3" with Ranger Ink's Glue & Seal (this product was great for this project because the container has a small brush built in to the lid, so I was able to work in small areas) then sprinkled iridescent white glitter all over and let dry.  When working with Smoothfoam Balls I will insert a pencil or stylus into the small opening in the center of the ball to use as a handle.

 
I laid out several patterns of the Dew Drops from the Robin's Nest, which are small plastic gems that come in a wide variety of shapes and sizes, on a piece of white paper before I attached them to the ball.
 
Working in small areas, I kept attaching the Dew Drops to the Ball and then the patterns just starting flowing and soon my entire Ball was covered - in less than an hour!


My Pick N Place Pencil from KOOL TAK was perfect tool for this project.  It looks like an ordinary white pencil, but when you sharpen it the point is sticky.  This stickiness aids in picking up small items like the Dew Drops, so you can get accurate placement on your project.  I finished by tying a loop and a bow in some red organza ribbon and gluing it inside the small opening in the center of the ball.

 
Above are a few of the vintage ornaments that my Gran made in the 60's and 70's with foam shapes, straight pins, beads, sequins and trims.  They have always been amazing works of art to me and I treasure them dearly.  She was definitely one crafty lady!
 
Leave a comment here on my blog to be entered for a chance to win a great prize package of crafty goodies from Smoothfoam and The Robin's Nest and enter on each blog you visit in the hop!
 
Thanks for stopping by!  -Beth


Friday, November 8, 2013

Cre8Time to make a Fall Banner


I enjoy year round beautiful weather, living in SW Florida, but the one season that I truly miss is FALL!  The crisp air, the apple cider and especially the leaves changing color!

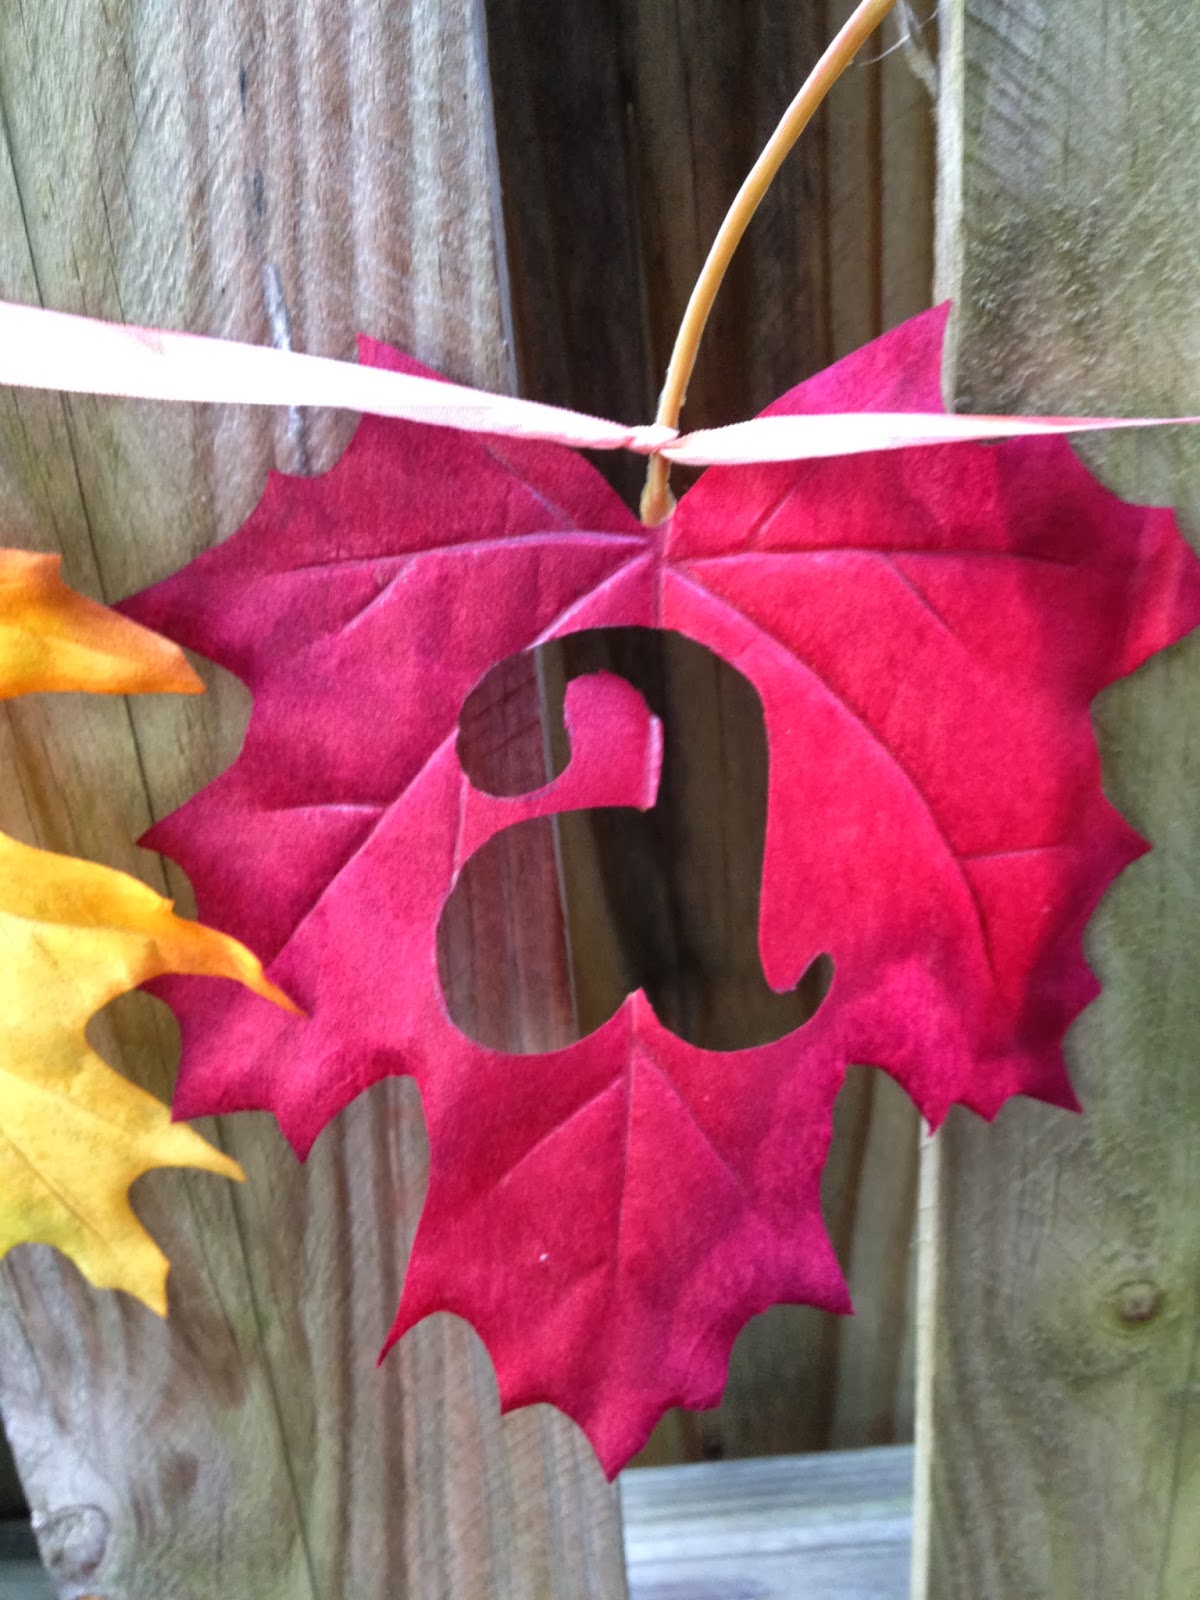
I found these giant Fall Leaves at Michael's and thought they would make a great base for a banner.  While messing around working through the creative process, I noticed a chipboard letter laying on top of one of the leaves and I thought - silhouette!  So, I simply traced each of my chipboard letters on to the silk leaf and cut it out with my craft knife.  I then tied a seam binding ribbon dyed a burnt orange color around each of the stems.


This entire project only took about 8 minutes to complete, so what can you CRE8TE in 8 MINUTES?  Visit the Cre8Time Movement on Facebook or on the Web and reclaim your Cre8tivity!  I DID!
 
Thanks for stopping by! -Beth


Monday, November 4, 2013

Thankful Turkey Mason Jar Craft

Welcome to the Designer Crafts Connection first Monday in November blog hop!

This month's theme is thank you gifts. 


My Mom loves Thanksgiving and gathers all of the family and friends around.  Our tradition is that right before dinner everyone shares what he or she is most thankful for, so I have created a Thankful Turkey Mason Jar Craft.  Now everyone can also write down their thankful memories and Mom can keep them from year to year.


Materials:
Mason Jar
3" Smoothfoam Ball
Echo Park collection kit & decorative brads - Fall Reflections by Lori Whitlock
Americana paint by DecoArt - Dark Chocolate
Xyron Mega Runner - 1/2" by 100'
Aleene's Original Tacky Glue from I Love to Create
Scissors, pencil, serrated knife, paint brush, plain paper, black self adhesive half pearls, metallic pens and Ribbon - 1" wide gold organza 20" long.

Here's how I made it:

1.  Insert pencil in the Smoothfoam ball and paint with dark chocolate, then set aside to dry.  Draw a feather shape on plain paper, cut out and trace on each paper in collection pack.  Cut out, fold in half and cut slits down the outside edge.  Trace and cut out a 6" circle from brown decorative paper.

2.  Cut 1/2" from Smoothfoam ball and glue flat surface to lid of mason jar, set aside to dry.  Attach feathers to circle in a fan pattern with Xyron Mega Runner.  Cut triangle for beak from mustard decorative paper and waddle from burgundy decorative paper, then attach with Xyron Mega Runner. Attach black pearls as eyes.


3.  Decorate jar, back and front of feathers with stickers from the Echo Park collection kit.  Tie ribbon around lid of mason jar and attach decorative brad with Aleene's Tacky Glue.  attach feathers to back of mason jar with Aleene's Tacky Glue, lay down on flat surface and allow to dry overnight.


4.  Cut 1" wide strips of paper from the ivory decorative papers.  Write thankful thoughts on papers with names and dates, then place in mason jar.


This is a quick and easy craft that you can make with your children to start a Thanksgiving tradition of thankfulness that will become keepsake for years to come!


Now you can HOP around to see what the other Designers have created with a THANKFUL theme in mind - I can't wait to see the creativity!  Just click the HOP BACK and HOP FORWARD buttons in the DCC icon on the right hand side of my toolbar!


You can also check out the HANDMADE HOLIDAYS BLOG HOP hosted by Jennifer Priest of Hydrangea Hippo that happened this past weekend!  Great Holiday crafting inspiration and ideas from a few of my crafty Friends as well as some great crafty Businesses - like SMOOTHFOAM!


Thanks for stopping by!  -Beth

Tuesday, October 15, 2013

Sunburst Mirror made with basic Craft Store Materials


I love to create what I like to call Craft Store Home Décor.  I see a few items as I am wandering the aisles of my local scrapbook or craft store and an idea starts brewing to create something I have seen in a high end store or catalog.  My item will cost much less and all of the items are readily available. 
 
Such is the case with a recent package I received from a new company called STICKY STICKS !   My mind was full of great ideas for these versatile craft sticks.  Sticky Sticks are self adhesive jumbo wooden craft sticks which can be used for a large variety of crafting projects and they are sponsoring our Designer Crafts Connection blog hop today!
 
Now on to my project!

 
Materials:
Round Wooden Plaque - 7"
Round Mirror - 6"
Pencil, Ruler, Scissors, Cardboard or Newspaper and a Picture Hanger

Layout the wooden plaque and Sticky Sticks on a large piece of cardboard or several layers of newspaper.  Mist with Pesto, making sure to get good coverage then let dry.  Mist very lightly with Peacock, let dry.  Mist with Biscotti, let dry.  The Perfect Pearls spray will give your piece glimmer and shine!  To speed up drying time use your heat gun.
 
The spray mists will give your unfinished wood pieces the look of a colored stain, which I love because it allows the grain of the wood to show through.  Attach the mirror to the front of the plaque with KOOL TAK Ultra Clear double sided tape.
 
Using your ruler and pencil, find the center of the back of your plaque and draw eight intersecting guidelines. 
 
Peel the liner paper and begin by placing Sticky Sticks at 12 o'clock, 3 o'clock, 6 o'clock and 9 o'clock.  Fill in the first layer by placing four Sticky Sticks in each blank section.  The adhesive is permanent and strong!
 
The first layer, when finished, will look like the photo above.
 
Add a second layer of Sticky Sticks by overlapping a new stick in the center of each pair on the first layer.  Attach a picture hanger to the back of your Sunburst Mirror, then hang and enjoy!
 
The Sunburst Mirror also makes a great centerpiece on any table to feature a favorite vase or other keepsake.
 
Thanks for joining me on the Sticky Sticks Blog Hop!  Now you can HOP around to see what the other Designers have created with their Sticky Sticks - I can't wait to see the creativity!  Just click the HOP BACK and HOP FORWARD buttons in the Designer Craft Connection icon on the right hand side of my toolbar!
 
Thanks for stopping by!  -Beth


Monday, October 7, 2013

DESIGNER CRAFT CONNECTION - FIRST MONDAY IN OCTOBER!

Let's just say that I "cherish" my paper crafting supplies.  That in no way, shape or form implies that I am a hoarder - wink, wink - know what I mean?!?


This Haunted line from Cosmo Cricket is a classic!  I have had it in my stash for several years, but thought it was so cute I could never bring myself to use it - REALLY?  Isn't that the whole point of creating is to use our supplies?  Well, there lies my dilemma.
 
I have had this project (and the supplies) in my head for a while now, but I finally sat down this past weekend and created these cute BOO Halloween Houses.
 
 
Here's how I made them:
 
Cover three Paper Mache House forms with patterned paper using a decoupage medium.  I like Claudine Hellmuth's Studio Multi-Medium in Matte.  It sets up quickly and the paper does not buckle. 
 
Add shingles using a scalloped border punch and Xyron's Mega Runner.  This is the stickiest double sided adhesive I have ever used and it is reasonably priced!
 
Make a patterned paper rosette for the center of each house, securing with Xyron's Mega Runner.  Punch out a 2" circle in a contrasting patterned paper and top with a black glittered chipboard letter.
 
Punch out Cosmo Cricket Haunted chipboard shapes and apply Haunted stickers.  Attach shapes to houses using Xyron's 3/8" Adhesive Dots.  This product gives you dimension, but the clear dot literally disappears on a project like this - brilliant!

Above are details of each House.  I embellished with a few rhinestones for sparkle.


Now you can HOP around to see what the other Designers have created with a Fall/Halloween theme in mind - I can't wait to see the creativity!  Just click the HOP BACK and HOP FORWARD buttons in the DCC icon on the right hand side of my toolbar!


Thanks for stopping by!  -Beth

Monday, August 19, 2013

More Exciting News to Share!

Good afternoon bloggy friends - I wanted to share this new magazine from Cloth, Paper, Scissors called I HEART PAPER!  Which, of course, I do! 

I have a project article published called FUN FLOWER FRAMES! 


You can create these cute flower frames from simple wooden plaques from the craft store along with scrapbook paper and trims to match your home décor or party décor!

Thanks for stopping by! -Beth

Thursday, August 15, 2013

Whim So Doodle Design Team!

I just wanted to pop in an make an announcement.  I have been selected to be a part of the Design Team at Whim So Doodle, my favorite LSS in St. Petersburg, Florida!


NEWDS DT 2013
We were humbled and overwhelmed by the outpouring of talent represented in all of you who applied to be a part of our Design Team.  Thirty-two {32} amazing submissions were received.   
 
We are so thankful for each and every one of them. We had an "outside panel" of three experts come in to make the decisions. 
 
Congratulations to the following for being chosen...
 
Linda Alexander
 Jules Eickmeier
Tracy Gregory
 Nicole Guincho
Jackie Lynch
Kim Mathura
 Kay Mitchell
Joan Morrison 
Amanda Newberry
Beth Watson
Lindsay Weiser
Lori Wilbanks
 
    Thank you! - The Doodle
 
Check out their Website and Blog and like them on Facebook and follow them on Pinterest!  Whim So Doodle carries a wonderful variety of scrapbook, stamping and mixed media supplies - they also bring in big name teachers to host classes!
 
Thanks for stopping by!  -Beth