Monday, July 15, 2013

DESIGNER CRAFTS CONNECTION - ROWLUX® ILLUSION FILM BLOG HOP!

Recently, my Designer friend, Marisa Pawelko started working with ROWLUX® ILLUSION FILM - and WOW what a fabulous and interesting product!  The films have intensely saturated colors and very cool three dimensional effects.  They are flexible and easily cut with scissors or a craft knife, so they are perfect for many different applications within your craft projects.


Now, on to my project!

I love Christmas year round - making and giving ornaments is my favorite thing!  I have always wanted to make one of these spheres, but never had the right materials.  Now with the flexible Rowlux® Illusion Film, the sphere will keep it's shape when packed and not be crushed like scrapbook paper.

MATERIALS:

INSTRUCTIONS:

1.)  Measure and draw propeller style pattern on plain white paper with pencil.  Make each blade 2" long with 1/4" circles at both ends and the middle.  Cut out pattern.  Trace pattern four times on film with black pen.


2.)  With scissors, cut out four pieces.

3.)  Punch holes in top, middle and center of each piece.

4.)  Measure and cut a 24" length of thin white ribbon.  Thread button on to ribbon, placing in center, leaving two 12" "tails".  Knot ribbon.

5.)  Thread on each piece, using center hole.

6.)  Thread on a second button and knot ends of ribbon.

7.)  Measure 2" and make a knot in the ribbon.  Thread on a third button and knot ends of ribbon.

8.)  At this point the pattern pieces are stacked on top of each other.  Thread the left end, then the right end of the first pattern piece on to the ribbon.  Repeat with the other three pattern pieces.

9.)  Knot the ribbon.  Thread on a fourth button and knot the ends of the ribbon.  Trim the ribbon tails to 8" and knot at the top to create a hanger.

Experiment with other shapes, punches, stamps and stickers to create an ornament of your own.  This product is also very kid friendly, since you can cut it with scissors!

Now HOP on over to Marisa's Blog and see all of the other imaginative projects that the other Designers have created with Rowlux® Illusion Film!

MORE DETAILS:
This revolutionary material has been utilized in award winning point of purchase displays, packaging, signage, artwork, footwear, lighting, interior design, retail display fixtures and beyond. Our new frontier is the craft industry! There's absolutely nothing like it on the market, and I personally believe without a doubt that Rowlux® Illusion Film is THE future of crafts!

Rowlux® Illusion Film is made in the USA and comes in a diverse range of spectacular eye-catching colors and patterns.  These durable, translucent, 12" x 12" polycarbonate sheets add instant pizzazz to craft projects, seasonal accents, party decorations, scrapbooks, greeting cards, jewelry, furniture, frames, gifts, favors, accessories, art and DIY home decor projects. Easily cut with scissors, Rowlux® is also the perfect material for scoring, folding, embossing and die cutting. The creative possibilities are endless. This innovative and inspiring new craft material manipulates light to create dazzling visual effects. The illusion of depth and motion is the result of thousands of tiny parabolic lenses that are molded into the surface of both sides of the material. These lenses create a pattern of light reflection and refraction resulting in stunningly brilliant optical effects.

To instantly add "POP" and "WOW" to your projects, just add Rowlux®!

For special promotions, giveaways and to keep up to date on the exciting Rowlux® Illusion Film craft revolution, be sure to:

Follow Rowlux® on Twitter

LIKE Rowlux® on Facebook

Follow Rowlux® on Pinterest

Subscribe to Rowlux® on YouTube

Helpful Hints for Crafting with Rowlux®:

Adhesives: The optical effects are diminished when the product gets wet, therefore the ideal method for adhering translucent Rowlux® is with a light coating of spray mount. This works very well when you are applying flat pieces to flat surfaces. Liquid adhesives and resins will fill the lenses and diminish the optical effects.

If you wish to manipulate the material and create a stronger bond than can be accomplished with spray mount, I recommend hot glue. Just be sure to glue strategically in spots that are hidden, such as in the back or on corners, since the liquid nature of hot glue will diminish the optical effects and the glue will be visible due to the transliucent nature of the material. You can always cover any areas where the glue shows and effects are diminished with a button, gem or other embellishment.

Tools: Rowlux® can easily be cut and scored with paper trimmers. Scissors, Sizzix® steel rule dies, Sizzix® embossing folders and Sizzix® Scoreboards (which cut and score) by Eileen Hull also work well. Rowlux® can be manually bent, rolled and folded and is also great for flatwork.

If you come up with inspiring new ideas, techniques and methods for working with Rowlux®, we invite you to share what you’ve come up with in your posts!

Thanks for stopping by!  -Beth

Monday, July 1, 2013

DESIGNER CRAFT CONNECTION - FIRST MONDAY IN JULY


Good Monday Morning everyone! 

Well, it is the First Monday in July, so the Designer Craft Connection is hosting our monthly Blog Hop and the theme for July is CELEBRATIONS!

There are ALOT of Celebrations throughout the year, so I have created a Chalkboard Banner - this way the message can be changed to suit each Celebration!

Now, on to my project!


Materials:
Maya Road canvas banners - 6
Americana paint by DecoArt - chalkboard paint in black
Tim Holtz Alterations tiny attacher
Ranger ink Tim Holtz distress ink in Tea Dye
Hero Arts stamp design block  Dots and Flowers - S5213
Xyron Mega Runner - 1/2" by 100'
Xyron 3/8" Adhesive Dots
Aleene's Original Tacky glue
Scrapbook papers - black and white stripe, flowered, solid coral and patterned turquoise.
Wooden circles - six that are 3" in diameter
Ribbon - 1" ivory gross grain - 60" long
Buttons - ivory, six
Rhinestones - amber, six
Mists in turquoise and mocha

Pencil, ruler, paper trimmer, flower punch, scalloped border punch, paper plate for palette, water basin, paper towels, scissors, corner rounder punch and chalk.


Instructions:
1.) Ink flowers and dots stamp with tea dye and stamp on all 6 canvas banners.  Mist lightly with mocha and turquoise spray mists.  paint 6 wooden circles with at least 2 coats of black chalkboard paint, let dry. 
2.) Cut twelve 2" by 12" strips from flowered paper, fan fold.  Attach two pieces together with mega runner, then attach ends to form a tube.  Apply tacky glue to the backside of a wooden circle.  Gather fan folded tube with one hand and push down with the other to form a fan.  Center on BACK of wooden circle in glue.  Place glue bottle on top to weigh down until dry.  Repeat to create five more rosettes.
3.) Cut twelve 1/2" by 12" strips from black and white striped paper.  Punch one edge with scallop border punch.  Attach to backside of canvas banners with mega runner, trim excess paper to fit.  Punch six flowers from coral paper, attach buttons and rhinestones with adhesive dots then attach to point of each banner.
4.) cut six 1" by 6" strips from turquoise patterned paper and round corners with a punch.  Attach to top edge of each banner with mega runner.  Using tacky glue, attach rosettes to banners, let dry.
5.) cut a 60" length of 1" wide ivory ribbon.  Measure in 12" from end and attach first banner with tiny attacher stapler in an "X" pattern.  Attach rest of banners leaving 1" in between each.  Write message on banner with chalk, hang and enjoy!


There are ALOT of other messages that can be added to the Chalkboard Banner - here are just a few:

Spring
Summer
Winter
Autumn
Design
Create
Party!
XOXOXO
~HOME~
❤Love❤
{HUGS}
I ❤ Art!

Now you can HOP AROUND to see what the other Designers have created to CELEBRATE this first Monday in July!  Just click the HOP FORWARD or HOP BACK buttons on the DCC icon on the right hand side of my toolbar!

Thanks for stopping by! - Beth

Tuesday, June 18, 2013

SMOOTHFOAM Cupcake Shaped Gift Box

I have a project that has been featured over on the SMOOTHFOAM Blog!

Check out my Cupcake Shaped Gift Box and get the complete instructions!


Thanks for stopping by!  -Beth

Saturday, June 15, 2013

DESIGNER CRAFTS CONNECTION - ETCHALL BLOG HOP!

I was so excited when Barbee, the "Etchall Lady" sent some of the Designer Crafts Connection members etching creme, masking film, a craft knife and full instructions. I am always interested to try out products that are new to me and see what I can create with them. 
 
I have not etched anything since I was in grade school (in the 70's) and etched a monogram on to a glass plate for my 5th grade teacher. My Grandmother helped me (as she did with many crafting projects) and I can remember how we had to wear gloves, be very careful and the smell was not great.  
 
Now, Etchall Creme has no smell, is mild and works in 15 minutes. I was so excited to try this out! I purchased a few different glass items and was all set to etch, but while researching, I came across a cool technique which is a combination of etching and embossed stamping. I decided to try this technique on a glass pebble pendant - so many possibilities!
 
Now on to my project!
 
Hero Arts Kaleidoscope Flowers wooden block stamp set.
Ranger Ink Archival black ink pad.
Ranger Ink Heat It tool.
Clear embossing powder.
Black Lacing or Ribbon.

Basic Supplies:
Soft cloth and rubbing alcohol, scissors, ruler.

Instructions:
1.)  Clean the surfaces to be etched with soft cloth and rubbing alcohol. 

2.)  Die cut the smallest butterfly from the masking film. Peel the backing paper and apply the negative outline of the butterfly to the back of one of the glass pendants, smooth with squeegee.  Using the squeegee, apply a generous, but even amount of Etchall Etching Creme to the back of both pendants. Let sit for 15 minutes. Remove as much creme as possible with the squeegee and return to the container. Rinse pendants under cool running water and dry completely with soft cloth. 
 
3.)  Ink butterfly, place stamp ink side up on work surface and stamp by pressing glass pendant on to the stamp. this will allow for precise placement of your image. Sprinkle with clear embossing powder, set aside. Repeat with flower stamp.
 
4.)  Using Heat It tool, emboss both images. This will set the ink on the back of the pendants.
 
4.)  Allow glass pendants to cool. 
 
 
5.)  Color in images with Marvy Brush Markers and set ink with Heat It tool. Measure and cut black lacing or ribbon to desired length, thread through shank and secure end with a knot. 
 
Wear and enjoy!
 
A great craft to make with your kids, etching with Etschall Creme is quick, easy and not messy at all. The kids will be wowed by the etching process and results! 

Now it's time to Hop around to the other DCC designers to see the wonderful projects they have created using Etchall Etching Creme. Use the DCC button on the right side bar and click the back and forward.

I am excited to create more projects using Etchall Creme - I think mirrors are next!

Thanks for stopping by! -Beth

Monday, June 10, 2013

KOOL TAK Father's Day Treat Jar!

I have a project being featured over on the KOOL TAK Blog! 

Check out my Father's Day Treat Jar and get the complete instructions!


Thanks for stopping by! - Beth

Monday, June 3, 2013

DESIGNER CRAFTS CONNECTION - FIRST MONDAY IN JUNE

June is here, the kids are done with school and Summer is just around the corner! 
 
It is the first Monday of the month once again and the Designer Crafts Connection is back with a creative blog hop loaded with tons of inspiration because our theme is HAPPINESS IS...
 
This theme swings open the doors of creativity and allows each Designer to showcase a craft or project that makes us HAPPY!
 
Now on to my project:
 
My happiest crafting projects are those that I can just create - they are not for a particular design team or magazine submission - they are just pure, wild and free!
 
I live in sunny Southwest Florida and some weekends are spent at the beach.  On a trip last year to Upper Captiva Island (which you can only get to by boat) we walked on the beach and collected shells.  I have collected shells from all over and they live in a dish on my coffee table.  I decided to feature several whole gems that I have found and decided to create a canvas shadow box to showcase them.
 
 
Materials and Supplies:

Pencil, ruler, decorative edge punches, craft knife, three small shells, three small starfish, self adhesive rhinestones and pearls, gorilla tape.
 
Instructions:
1.  Measure 6" in from the left edge and draw a line down the center of the canvas.  Measure in 4 1/2" from left edge, draw a line down the length.  Measure in another 3" and draw a line down the length.  Measure down 4" from the top edge and draw a line across the canvas.  Measure and draw lines across at 3", 3,5", 3", 3.5", 3" and 4".  Draw an X through each of the three 3" by 3" squares.  Carefully cut each X with a craft knife and secure the backside of the triangles to the inside of the jewelry box with Tacky Glue.  Secure on the backside of the canvas with gorilla tape.
2.  Measure and cut three squares that are 5" by 5" from scrapbook paper.  Cut a 2" long diagonal slit at each corner, fold and insert in to each box to dry fit.  Attach with Premium Extreme to secure.  Spray mist four lengths of crepe paper streamer in each of the four colors, let dry.
3.  Measure 16 to 18 different scrapbook papers between 3" and 4" wide.  Cut, tear and punch in random patterns.  Distress papers and edges with Tea Dye Ink.  Layer and dry fit the papers until pleased with the configuration.  Starting at the bottom, secure each layer of paper and crepe paper with Premium Extreme.
4.  Embellish the canvas with lace, chipboard shapes, seashells, starfish, rhinestones and pearls.  Attach the conch shell, starfish and sand dollar with Foam Adhesive Pads.  Trim edge of canvas with ribbon attached with Premium Extreme.
 
Hang and enjoy your beachy memories!
 
I hope that you have enjoyed my post for today! Now you can HOP around to all of the DCC Designers to see the HAPPINESS IS... themed projects they have created! Just use the navigation box on the right hand side of my blog to hop forward or hop back!
 
Thanks for stopping by!  -Beth

Monday, May 6, 2013

DESIGNER CRAFTS CONNECTION - FIRST MONDAY IN MAY!

May's DCC theme is WISH! 

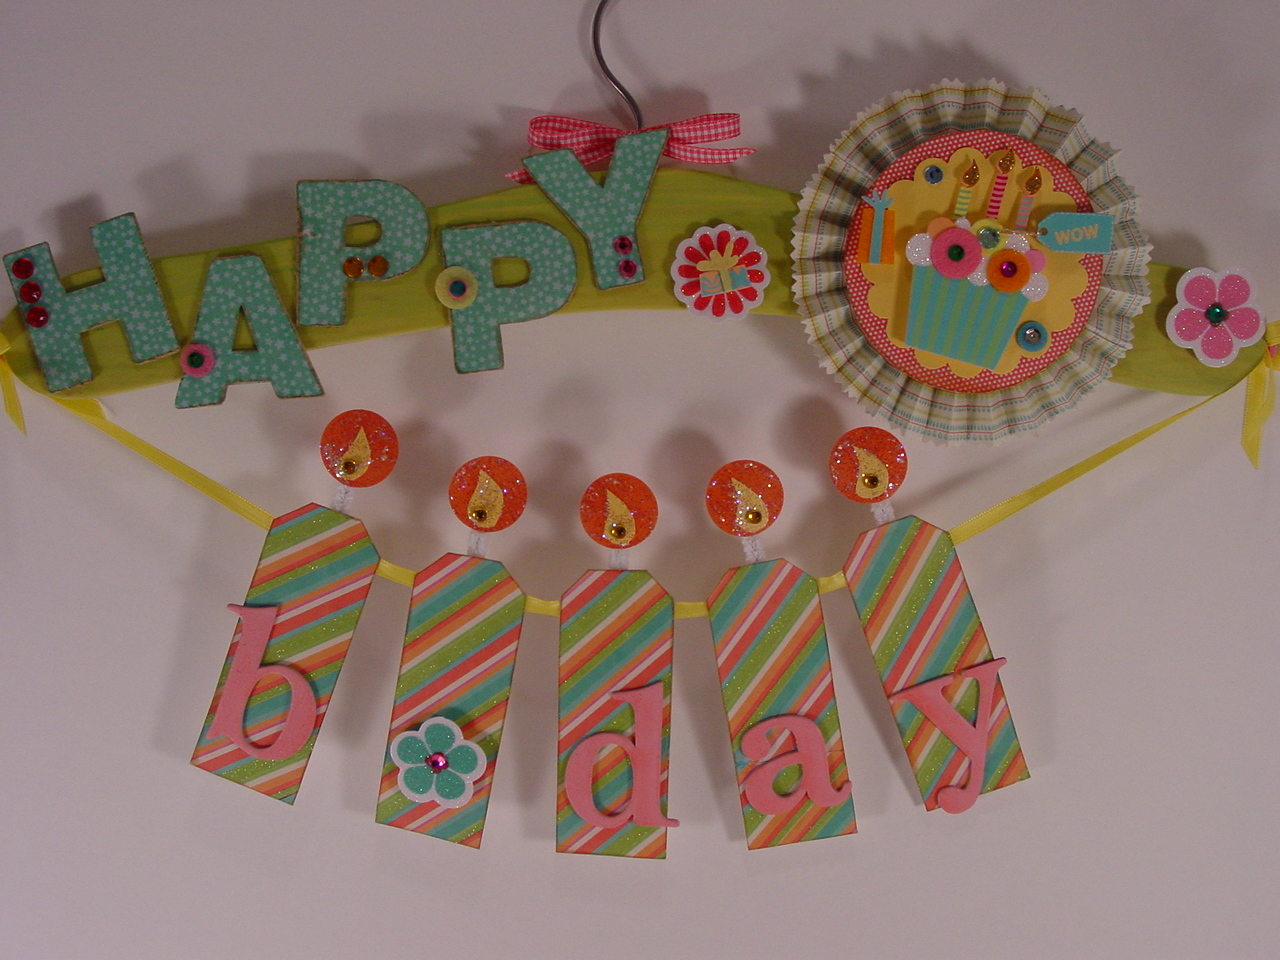
Wishes always remind me of Birthdays - "blow out your candles and make a wish!" - so I have created a mixed media BDAY HANGER that I would like to share today. 


MATERIALS & SUPPLIES:
INSTRUCTIONS:
1.)  Lightly sand the wooden part of the hanger.  Dilute Pistachio Mint paint by half with water and paint on hanger to achieve a stained effect, let dry.  Once dry distress with Tea Dye ink.  Paint chipboard bday letters Petal Pink.  This may take several coats, let dry.  Paint Tacky Glue on letters, sprinkle with clear glitter and set aside to dry.
 
2.)  Attach striped paper to shipping tags with Premium Extreme double sided adhesive tape, then trim 1/2" from either edge of tag.  Punch five 1" circles from orange glitter paper and cut out five "flames" from yellow glitter paper.  Layer together with Premium Extreme.  Attach flames to candle with 2" sections of chenille stem and Tacky Glue, let dry.  Attach bday and flower to front of candles with Tacky Glue, let dry.  Lay candles out upside down and attach yellow satin ribbon with Tacky Glue, let dry.
 
3.)  Attach polka dot paper to chipboard letters HAPPY with Premium Extreme, distress edges with Tea Dye.  Attach randomly to left side of hanger with Foam Adhesive Pads. 
 
4.)  Cut two strips from pastel striped paper 4" by 12" and attach with Premium Extreme to create one 24" length.  Fan fold entire length, creasing with bone folder, and attach ends with Premium Extreme to create a tube.  Cover 3" chipboard circle with Premium Extreme, gather and push down on tube to form a rosette.  Layer an orange gltter paper 3" circle, then a yellow glitter paper 2 1/2" scalloped circle, then cupcake embellishment.  Attach to right side of hanger with Foam Adhesive Pads.
 
5.)  Attach yellow satin ribbon with candles to each end of hanger with thumb tacks, cover tacks with buttons or other embellishments.  Tie pink gingham ribbon in bow around hanger hook, trim ends.  Attach embellishments, sequins and rhinestones to hanger as a finishing touch. 
 
Personalize your HAPPY BDAY hanger with specific colors and/or themes to match a Birthday party OR add the Birthday boy or girl's name! 
 
I hope that you have enjoyed my post for today! Now you can HOP around to all of the DCC Designers to see the WISH themed projects they have created! Just use the navaigation box on the right hand side of my blog to hop forward or hop back!
 
Thanks for stopping by!  -Beth

Saturday, May 4, 2013

Ann Butler Designs Unity Stamp Company Blog Hop

My designer friend, Ann Butler, has created her very own line of rubber stamps with Unity Stamp Company!  I am so very excited to be a part of the hop!


If you would like to order some of these high quality unmounted rubber stamps there is a 50% off coupon deal offered by Unity for anyone ordering Ann's stamps between Thursday May 2 - Monday May 6 at midnight CST. Make sure to give the coupon code- Unity5.  Use this link to view the entire line of Ann Butler Designs Stamps!

In order to celebrate Ann's stamp release, she is hosting a blog hop, so hop around to see all of the uniquely inspiring projects created with these fun stamps.


These stamps are fun and easy to work with because everything is sized in 1" squares, 2" squares and triangles, so everything coordinates and fits together perfectly.  I definitely love quilting, but do not have the patience or skill to actually make one, but with these stamp sets you can create a "quilt" on any project you can imagine!

Now, on to my project!  

MATERIALS & SUPPLIES:

INSTRUCTIONS:
1.)  Stamp a variety of the patterns on coordinating card stock colors and cut out with scissors.  Dry fit on lid of cigar box until you are happy with the pattern and color arrangement.  Attach to box lid and box sides with Multi-Medium Matte, let dry.
2.) Paint wheels in Chocolate Brown, let dry.  Paint a distressed top coat with Light Foliage, let dry.  Adhere two wheels together then attach with Tacky Glue to bottom of cigar box.
3.)  Distress Word Tag with Sea Glass Green, attach to Key Hole using Toggle Clasp.  Distress Key Hole with Uniform Blue and attach to front of cigar box with Tacky Glue.  Distress Word Key with Yellow Ochre, tie on seam binding ribbon in a bow and attach to top inside edge with tacky glue.

I hope that you have enjoyed my project today, please hop around to see what all fo the other designers have created!

Thanks for stopping by!  -Beth


Friday, April 12, 2013

DESIGNER CRAFTS CONNECTION - COUSIN SLIDE BRACELETS!

One of most exciting facets of being a creative designer is when companies send you complimentary products to create with!  The Cousin Corporation (which is just up I-75 from me in Largo, Florida) is a family owned jewerly crafting and bead company that started out in 1970.  Truly a success story.
 
Cousin has a new Slide Bracelet line that is available at Joann's.  They are quick and easy to create and come in a variety of fashionable colors and themes.  Check out the video and pick up some components today!
 
 
I received a blue and a red leather bracelet with burnished gold clasps and slides along with a cute owl and heart accent slides. 
 

For the first slide bracelet, I "painted" the blue leather with Ranger Perfect Pearls, then embellished the owl slide with Turquoise Stickles by Ranger and more Perfect Pearls.  Measure your wrist and cut the leather down to size with wire cutters.  Use just a small dab of E6000 glue to secure your owl and accent slides in position, then secure the clasps.  I also added square turquoise rhinestones that I had in my stash.

For the second slide bracelet, I stamped on the red bracelet with a script handwriting stamp, to look like love letters with Ranger Archival Ink.  Then I inked in the center of the leather with the black ink to set off the heart slide.  Measure your wrist and cut the leather down to size with wire cutters. Use just a small dab of E6000 glue to secure the heart and accent slides in position, then secure the clasps. I also added small black half pearls that I had in my stash.
 
 
I hope you have enjoyed my Cousin Slide Bracelet projects today.  As a part of the Designer Crafts Connection Blog Hop, please use the navigation box on my right sidebar and hop back or hop forward to see all of the gorgeous and creative ways that the rest of the designers have featured their Cousin Slide Bracelets.
 
Thanks for stopping by!  -Beth

Monday, April 1, 2013

DESIGNER CRAFTS CONNECTION - FIRST MONDAY IN APRIL!


Welcome to the DCC Blog Hop for April!  Our theme this month is one that I live by - RECYCLE - not only in my everday life, but also in my craft life.  I love saving containers, cast-offs and unusual materials then turning them in to something completely unexpected!

That is just what I did this month with my FAUX DENIM WREATH with BUTTON FLOWERS, so let's get on to the project!

MATERIALS & SUPPLIES:
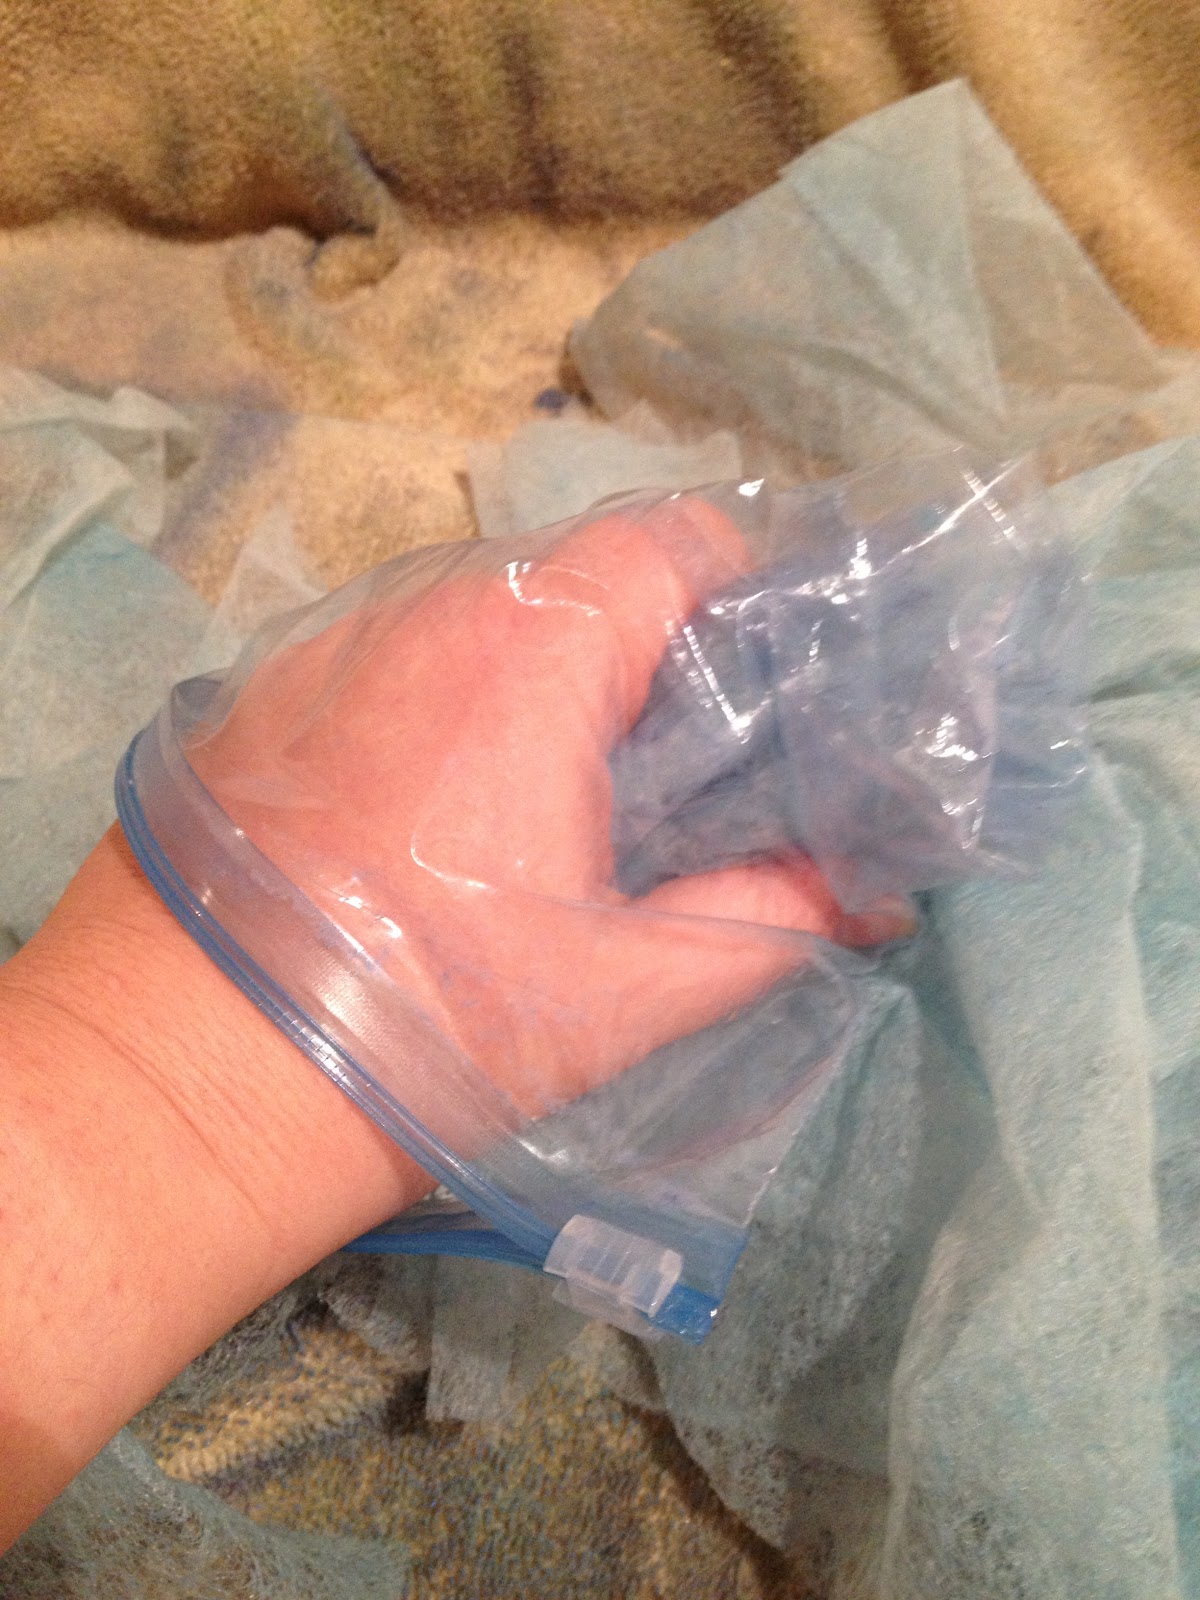
1.)  Lay out half of the dryer sheets on an old towel and randomly spray with Cornflower and Blue Smoke spray mists.  Place the plastic storage bag on your hand and randomly "scrunch" the dryer sheets to distribute the spray mist evenly.  Repeat with second half of dryer sheets using the Turquoise and Forever Blue spray mists.  Place in dryer with towel for 5 minutes to dry.
 
2.)  Measure in 1 1/2" from edge of Smoothfoam Disc in one inch intervals around the disc and connect the measured marks to create a circle.  Cut the center from the Smoothfoam Disc to create a wreath shape and sand lightly.  Paint the front and sides of the Smoothfoam with Americana Paint in Baby Blue, let dry.


3.)  Cut each dryer sheet in smaller pieces by folding and cutting in half three times to create rectangles approximately 2" by 1".  Place one piece of dryer sheet on the Smoothfoam at 12 o'clock, then poke and twist into the foam with the tip of a sharpened pencil.  This will create a "tuft" of fabric AND secure the fabric in the foam.  Continue to poke and twist all of the pieces of dryer sheets randomly in to the top and sides of the Smoothfoam until all of the foam is covered.


4.)  Double stack colorful buttons then "thread" wire through the button holes and twist to secure.  Randomly place all button "flowers" on wreath by poking wires in to the Smoothfoam.


Hang up your wreath and ENJOY!

RECYCLING TIPS:
Tip #1 - Reuse mail order catalogs as paint palettes, simply open to the centerfold, use then rip off and discard in the receyle bin!
Tip #2 - Reuse plastic bags instead of expensive latex gloves when painting, misting, etc.  It saves your hands from getting stained!
Tip #3 - Reuse cereal and other food boxes when you need chipboard shapes and or letters.  Either trace and cut the shapes you want or Die Cut.  Cover the printed side with paper or paint!
Tip #4 - Reuse soup and other food cans a water basins to wash out your paint brushes - OR - cover these cans with paper or fabric to hold your paint brushes in your studio!
Tip #5 - Reuse the plastic containers that Crystal Light drink mix is packaged in.  They are great to store small items like flowers, brads, beads, etc. OR fill them with goodies.  I make Sweet and Spicy Nuts for my family and friends at Christmas time and these containers are the perfect size!

Well, I hope that you have enjoyed my post for today!  Now you can HOP around to all of the DCC Designers to see the FLOWER themed projects they have created with items that they have RECYCLED from around the house!  Just use the navaigation box on the right hand side of my blog to hop forward or hop back!

Thanks for stopping by!  -Beth

Saturday, March 9, 2013

DESIGNER CRAFTS CONNECTION - BUTTONS GALORE & MORE BLOG HOP

Today a group of Designers from the Designer Crafts Connection are hosting a Blog Hop with Buttons Galore & More!  BGM has generously donated buttons for us to create with. 
 
The give away from Buttons Galore & More and Viewtanier starts today and ends on March 17th. Leave a comment to enter. There will be a prize for one participating Designer and one Reader who comments. Drawings are random, so leave comments on all the blogs for more chances to win!
 
We were given a theme of Wedding, so I decided to make a keepsake tin.


Start out with a new or recycled tin in any shape or size, mine was round.  It was already silver, so I decided to put a more modern twist on the gold buttons I received.


Begin by cutting the shank from the back of your buttons with wire cutters.  Then dry fit the buttons on the top of your tin until you are pleased with the composition.  I always take a picture on my cell phone when I have items that are dry fit, so that if I bump or shift the piece I always know what my original design looked like.  Glue each button into place with Aleene's Original Tacky Glue from I Love To Create, then let dry.  This is my go to glue for my craft projects.

 
The next step is to lightly spray paint your button embellished lid with Krylon's Indoor/Outdoor Primer in White this blocks the base color of your project and primes it to take other types of paints and finishes.  It works on metal, glass, wood, plastic and alot of other surfaces.  I use this primer all of the time. 


Next paint your lid and base to match the color scheme of your Wedding.  I chose to keep it modern and country chic by using Design Master Super Silver to color my container. 


Add two lengths of crocheted lace trim, one around the edge of the lid and another around the bottom edge of the tin.  Secure lace with Tacky Glue, let dry.

 
Make a tin for each Bridesmaid in your Wedding party and fill with a lovely pearl necklace or earring set that you would like them to wear on the day of your Wedding.  Make a tin for yourself and keep memories of your Wedding Day inside.  I think it would be nice to inscribe the bottom of the tin with the Bride & Groom's names along with the date to truly create a keepsake.


Use the DCC hop button on my right side bar to see hop around many more fabulous button projects!

If you have the time, stop by and see the Buttons Galore & More NEW RELEASES visit the BG&M Blog at and follow them on FaceBook for projects and give aways!

Viewtainer has donated the containers for the contest winners, VIEWTAINER containers have clear walls, come in fun bright colors with an easy dispensing cap and NO spilling! Proudly made in the USA!  To see the complete line of Viewtainer products visit their website at www.viewtainer.com blog http://viewtainer.typepad.com/blog/ and like them on FB at www.facebook.com/Viewtainer!
 
Thanks for stopping by!  -Beth