Good Saturday Morning and WELCOME to the Ann Butler Designs and Deflecto Blog Hop!
Deflecto sent each of the Design Team Stars a sample of the craft frames that they feature on their website, so we could dress them up with lots of Ann Butler Designs goodness!
You probably arrived here from the fabulous Paula DeReamer's blog, but if you stumbled across my blog, please go to Ann Butler Designs blog to start!
Now on to my project -
BACKGROUND BASICS PINWHEEL PICTURE FRAME!
Here is what you will need:
- Ann Butler Crafter’s® Ink by Clearsnap – Limelight, Aquamarine, Sunshine, Lilac, Night and Berry
- Colorbox® Background Basics Stamps by Ann Butler – Checks, Diamond, Basket and Picnic
- Deflecto Craft Frame 8" x 10" Clear
- Tombow - Xtreme Permanent Adhesive, Xtreme Power Tabs and Dual Brush Pen Hot Pink #743
- Pastel Cardstock in Lavender, Pink, Green, Yellow and Blue; Ruler; Pencil; Buttons; Embroidery Floss; Scissors; Baby Wipes; Wooden Stamp Sentiment "All you need is Love".
1.) I received two Deflecto craft frames - 12' x 12" and 8" x 10", but decided to use the smaller because I had the perfect photo for this frame!
3.) Attach two contrasting squares together with Tombow Xtreme Adhesive. Draw lines from corner to corner, then measure 1" on either side of the center line.
4.) Cut on each of the four solid lines, stopping at the 1" mark.
5.) Attach a Tombow Xtreme Adhesive Tab to the center of the square.
6.) Fold in every other triangle point and secure to the adhesive to create a pinwheel.
7.) Select a contrasting button and tie a bow with embroidery floss. Attach button to pinwheel with Tombow Xtreme Adhesive Tab
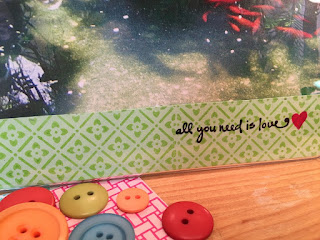
8.) Trim photo to fit frame. Stamp Background Basics Picnic stamp on a 1" strip of green cardstock with Limelight Ink, then stamp sentiment with Night Ink. Color a small heart with Tombow Dual Brush Pen.
9.) Attach four pinwheels to top of frame with Tombow Xtreme Adhesive Tabs.
Ann
Larissa
Einat
Zoey
Steph
Thanks for joining us on this creative blog hop today! I hope that you have enjoyed all of the inspiration!
"Like" Ann Butler Designs and Deflecto Craft on Facebook!
"Tweet" Ann Butler Designs and Deflecto Craft on Twitter!
"Follow" Ann Butler Designs and Deflecto Craft on Pinterest!
For more project ideas, tips, tricks and techniques!
Thanks for stopping by! -Beth


