Pages

Friday, December 1, 2017

Mixed Media Blog Hop featuring three of my favorite Designers!

How to make a Mod Christmas Wreath

Happy Friday Y'all!  I am beyond excited to share my Mod Christmas Wreath - and you won't believe what it is made from!

A PLASTIC SILVER TRAY!

This month the design teams of three of my favorite designers have been sharing our unique projects in a fun collaboration of color and pattern.  Colorique by Lisa Jimenez,  ArtFoamies Stamps by Rita Barakat plus Crafter's Ink and Background Basics Stamps by Ann Butler Designs  Now, as y'all know I am very familiar with Ann Butler Designs and faux quilting, but I was excited to work with new products from two fellow designers who I really admire.

I purchased several plastic silver trays for a party, but never used them, so they have been sitting in my "to be upcycled" craft stash (which seems to grow organically LOL!).  Thinking that the round one would make a perfect wreath for the holidays, I grabbed them and got to work...
Place a quarter size puddle of Colorique Verdigris and Turquoise Mountain on a paper plate.  Pounce Verdigris onto the edges of the tray with an old paintbrush.  Wipe off some of the ink with a baby wipe, so the silver shows through.  Repeat with Turquoise Mountain.  Colorique is an opaque liquid ink that dries quickly and can be applied to most hard-to-color surfaces like plastic, glass and metal.

Once dry, cut a line across the inside of the tray with a craft knife on a self healing mat.  Take your time as this will take several passes with a sharp craft knife.  Then using sharp, pointed scissors, carefully cut the middle away from the tray.

I loved the swirly pattern in the Zen Doodle Cloud ArtFoamies Stamp, so I used it with Crafter's Ink in Berry to create an all over pattern on pink card stock.  The image from this foam stamp is crisp and clean, oh and did I mention I love the swirls!  

Once the ink is dry, trace one 2", 3" and 4" circle, then cut out with scissors.  These will be the holly berries!


Using the Background Basics stamps and Crafter's Ink in Evergreen, create a Faux Quilted background on bright green and olive card stock.  

Draw two holly leaves on plain white paper, one 5"long and one 7" long, cut out with scissors.  Trace both leaves onto both colors of card stock and cut out with scissors.  Fold each leaf in half length-wise.

Attach the holly berries and holly leaves to the wreath in varying layers with Foam Tape from Tombow.

Here is a close up of the patterns and layers:

I hope that you have enjoyed my Mod Christmas Wreath and the next time you get crafty that you will use traditional materials in unconventional ways!
Ann Butler has posted a ROUND-UP of all of the wonderful projects, so hop over and take a look, there is a lot of inspiration!
Thanks for stopping by!
Creatively, Beth

Saturday, November 11, 2017

DIY Vintage Gumball Machine Ornament

How to make a Vintage Gumball Machine Ornament from upcycled materials

I have dedicated this year to trying to craft with my existing stash of supplies as often as I can, so a upcycled a ribbon spool, some glass ornaments I found in the closet and my Tombow Adhesives inspired this Vintage Gumball Machine Ornament!


Happy Saturday and welcome to the Creative Christmas blog hop hosted by Cassity at Remodelaholic  There are 26 fabulous designers sharing their #creativeChristmas projects this week.  So, after you scroll through my Vintage Gumball Machine ornament projects, please click on the links below to view all of the other projects!  It's going to be a Great Week!  


Here’s how I made it:

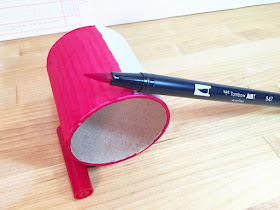
1.) Remove the top and bottom from the ribbon spool.  Sand away the glue and rough edges with a nail file.  Remove the sanding dust with damp paper towel, let dry.  Color with Tombow Dual Brush Pen #847 Crimson.  

Note: you could also use a section of a paper towel roll as well, just select a smaller glass ornament!


2.)  Remove top from glass ornament, apply red acrylic craft paint and set aside to dry.  Fill with 200 (7mm) assorted color pom poms.


3.)  Once dry, replace top on glass ornament.  Cut a 3″ by 3″ square from red cardstock.  Apply Tombow MONO Multi Liquid Glue to bottom rim of ribbon spool.  Attach to cardstock, let dry.


4.)  Punch small scroll label from silver metallic cardstock.


5.)  With the Tombow MONOTWIN Permanent Marker, draw on the coin handle and the gumball slot.  Attach to base of gumball machine with Tombow Xtreme Permanent Adhesive.  Remember, Xtreme is 5 times stronger than regular adhesive runners, so you have to roll to apply and swipe to the side to get a clean application.


6.)  Apply Tombow MONO Multi Liquid Glue to top edge of ribbon spool.  Attach pom pom filled glass ornament, making sure that it is straight and centered.  Set aside to dry.


7.)  Punch 3/4″ circle from red cardstock and apply “25¢” silver stickers.  I didn’t have a cent sign, so I created one with a lower case “c” and “l”.  Attach to front center of Gumball Machine with Tombow Xtreme Tabs.  These Tabs are strong and clear, so the adhesive won’t be seen through the glass ornament.  Thread through a 10″ length of red and white bakers twine, tie in a knot and hang on your tree!


These Vintage Gumball Machine Ornaments are quick and easy enough so you can craft up a batch of them with your kids for their Teachers, Family and Friends this holiday season! 

I had all of the supplies needed in my craft stash, but they can be purchased fairly inexpensively at your local craft or big box store.


Now it's time for the FUN stuff!

Follow the links below to get a close up peek at what all of the other talented designers have created for the #creativeChristmas blog hop!  I was blown away by the creative inspiration!  And NOW is the time to get crafty for Christmas! 


DIY Christmas Trees and Ornaments 
 Wintry Silver Dollar Store Christmas Tree Decor | Remodelaholic 
Marbled Christmas Ornaments | Doodlecraft 
Scrap Wood Inlay Ornaments | The Ugly Duckling House 
Woodburned Wood Slice Ornaments | Sisters What 
Flocked Pine Cones | Practical and Pretty 
Abstract Monogram Ornaments | Domicile37 
Concrete Christmas Ornaments | The Palette Muse 
Wood Slice Deer Ornaments | Our Crafty Mom 
Vintage Gumball Machine Ornaments | Beth Watson Design Studio 
Etched Glass Ornaments | Just Call Me Homegirl 
Unicorn Inspired Christmas Tree | The DIY Mommy 
Driftwood Reindeer Ornaments | Sustain My Craft Habit 

DIY Christmas Gifts and Decor 
 Christmas Pine Hoop Wreath | This Mama's Dance 
Gingerbread Man Candles | Nourish and Nestle 
Wire and Glass Chandelier | Home with Cupcakes and Crinoline 
Christmas Scroll Wall Art | Grace In My Space 
Lighted Wood Trees | Frazzled Joy 
Crocheted Christmas Hat | Luz Patterns 
Christmas Card Photo Display| Hertoolbelt 
JOY Porch Sign | Ginger Snap Crafts 
Folding Bar Cart Table | Everyday Party Magazine  
Wood and Burlap Christmas Sign | Leap of Faith Crafting 
Wood Block Snowman | Anika's DIY Life 
Holiday Candle Wrap | Dragonfly & Lily Pads 
Christmas Pom Pom Pillow | Small Home Soul 
Hand Lettered Wall Art | Smiling Colors


YouTube inspiration can be found here:


If you like what you have seen here, please visit my Instagram page for more inspiration!

Thanks for stopping by!  

Creatively, Beth

Sunday, November 5, 2017

Upcycled Gingerbread House Gift Bag

Make this Upcycled Gingerbread House Gift Bag in just 15 minutes!


This week I am participating in Craft Lightning where a group of blogger friends are rounding up Christmas crafts you can make in 15 minutes or less.  Hosted by Angie at the Country Chic Cottage, Carolina at 30 Minute Crafts and Jessica at Mad in Crafts, we will be sharing new projects everyday this week, so check back and click through!  
If you are like me, I always have a ton of Kraft paper shopping bags collecting on a shelf in my laundry room, because I just cannot throw them away!  At Christmastime I like to upcycle those bags to use for presents, it’s good for the planet (and my wallet!)
Now, I have had this idea floating around in my head for quite a while – a Gingerbread House Gift Bag – but it turned out much cuter than I even imagined!
Here’s how I made it:
I grabbed a medium size bag (8″ by 10″) and a sheet of 8 1/2″ by 11″ kraft cardstock.  Fold the cardstock in half at the 5 1/2″ mark and crease.  Measure in 1/4″ on each side of the fold.  Draw a diagonal line from each mark on fold to each bottom corner.  Trim with scissors.  Measure to center of fold line and make a mark.  Measure gift bag handles and using craft knife, cut out a rectangle 1/4″ deep by handle width (mine was 3″).
Scallop bottom edge of kraft cardstock with scissors.  Draw diamond pattern on to roof with white dimensional fabric paint, set aside to dry.

Punch squares and rectangles from white cardstock and dry fit onto front of bag for windows, doors, etc.  Color with Tombow Dual Brush Pens 847 Crimson, 451 Sky Blue, 245 Sap Green and 025 Light Orange.  The shapes still looked flat to me, so I got out my Tombow MONOTWIN Permanent Marker and created depth with doodles and outlines.  That small detail made ALL the difference – I love the creative process!
Layer shapes with Tombow Foam Tape to create dimension.


Punch two small flowers and a heart to decorate the front door.  Punch hearts and starburst to decorate between windows.  Punch scalloped ovals, cut in half for gumdrop border.  Punch circles and cut out rectangles for lollipop trees.  Tie bakers twine bows around lollipops.  Attach accents to bag with Tombow Foam Tape and Tombow MONO Permanent Adhesive.

Accent all of the candy embellishments with Tombow MONO Glue Pen and ColorBox Glitter by Clearsnap, set aside to dry.  The Glue Pen is excellent for detailed accents because the pen tip gives you complete accuracy.
The final ICING on the Gingerbread House is icing accents created with white dimensional fabric paint!  Set aside to dry.

Slide roof on over handles of bag and gift to your favorite person this holiday season!
These bags are quick and easy to put together in an afternoon and can be adjusted to any size shopping bag you might have on hand.  Craft up an entire neighborhood of Gingerbread House Gift Bags with your kids to give to their favorite teacher, babysitter or friend!
Click the link below and check in each day this week to be inspired by the rest of the fabulous bloggers that are sharing their 15 minute Christmas Crafts!


Thanks for stopping by! 
Creatively, Beth

Friday, October 13, 2017

Halloween Popcorn Box Party 2017

Happy Saturday!!

I am excited to be participating in Laura Kelly from Me and My Inklings Halloween Popcorn Box Party 2017!

For me, spiders are one of the creepiest things associated with Halloween, but this spooky cute spider has stolen my heart!


We each received a package full of goodies from some really great sponsors including World Market, Kunin Group Felt, Udderly Smooth, Sizzix/Ellison and Oriental Trading.  There is also a giveaway, so make sure to scroll through my post to see the link...


To create my spooky cute spider, I started by painting the Popcorn Box with Lamp Black Americana Paint by DecoArt.  One coat did the trick!

Add giant wiggle eyes to black pom poms for the eyes and attach to the top of the popcorn box with hot glue.

Next punch 4 holes randomly in the right and left side of the popcorn box.  Insert fuzzy pipe cleaners into each hole...


 Bend the pipe cleaners to create legs of different lengths.


And then secure the pipe cleaners to the inside of the popcorn box with hot glue.


Fill with popcorn and ENJOY!


Create your own Popcorn Box and join the Party!


Now here is the FUN STUFF - PRIZES!  There are four prizes from Sizzix, Kunin, Udderly Smooth and World Market!  Enter below through the Rafflecopter widget.

a Rafflecopter giveaway

Thanks for stopping by!
Creatively, Beth

Faux Pallet Pumpkins featuring Tombow Pens and Adhesives

Good Friday Morning, or should I say FRI-YAY!  I have the pleasure of writing this post from my delightful room at the Quartermain House B & B, owned by my dear friend, Debra Quartermain.  A lovely setting, but I will share more about this wonderful weekend in a blog post later.

Now on to business!  Crafty business that is!

For the final round of the Tombow Design Team we were sent a box of supplies, of which we had to use at least 2 adhesives and at least 2 pens.


From that box of goodies, I put all of my inspiration into faux pallet pumpkins to decorate my Happy Fall Y'all sign.  Follow along below to see how I created this sign and the techniques I utilized.


I always begin with a sketch and I have to say that I just LOVE the new Tombow MONO Drawing Pens.  The 05 is my go to for drawing, doodling and working out my designs on paper before I begin creating.  Sometimes I color them in with Tombow Dual Brush Pens.


STEP ONE:
I had this wooden pallet sign  12" by 15" in my craft stash, but it was the grey color was all wrong for a Fall themed projects, so I fixed that with Tombow Dual Brush Pen 899 and a few baby wipes!  Watch the video below to see how I did it!


STEP TWO:
Recently I found these giant craft sticks and just have to hoard them add them to my collection of craft sticks.  Creating faux pallet pumpkins in several sizes required craft sticks in several sizes.  Line up three sizes of craft sticks in blocks and sketch pumpkins in in three different sizes using MONO Drawing Pencil in 3H grade.  Cut out the pumpkin shapes and trace onto the craft sticks.


STEP THREE:
Color the craft sticks with Dual Brush Pens 933, 925 and 946 using the edge of the brush tip.  Blend away the brush strokes with the Dual Brush Pen Blender N00.


STEP FOUR:
Carefully cut out each craft stick along the traced edge to create the pumpkin shapes.

For some of the cuts, I used a craft knife.

STEP FIVE:
Dual Brush Pens are extremely versatile.  Place the cotton lace on the Blending Palette and spray with the Mister, both from the Tombow Blending Kit.  I colored the white lace with Dual Brush Pen 020 to create an ivory lace to match the others in my stash.  Set aside to dry.

 STEP SIX:
To create leaves, color some plain paper flowers with shades of Dual Brush Pens in Green 245, 195, 133, 173, 098 and 158 using a light and a dark tone for each.

Then spray until soaked with the Mister from the Blending Kit and set aside to dry.

STEP SEVEN:
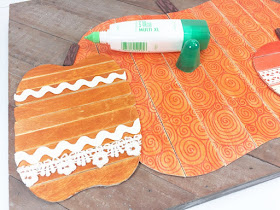
To give the large pumpkin added interest and texture I added a swirl pattern with the bullet tip of the  orange TWINTONE from the Bright Set.

STEP EIGHT:
Color the smallest craft sticks with the bullet tip of the brown TWINTONE from the Bright Set.  Attach the lace and rick rack with Tombow Xtreme Permanent Adhesive.  Remember to roll to apply, then swipe the tip to the side for a clean application.

STEP NINE:
Layout the pumpkins on the wooden canvas until you are pleased with the composition, then attach with MONO Multi Liquid Glue.  The MONO Multi is perfect for the impatient crater, like me, because it has a strong bond and sets up quickly.

Attach the stems next.

STEP TEN:
Fold over and squish the paper flowers to create leaf shapes.  Secure the layers and attach to the pumpkins with Tombow Xtreme Tabs, which are clear and five times stronger than traditional tabs.

STEP ELEVEN:
The final step is LETTERING!  I have grown to love and embrace my handwriting over this past year, so I measured out my saying HAPPY FALL Y'ALL to figure out where the middle was.  Transfer those measurements to the wooden canvas and fill in the lettering using the brush tip of Dual Brush Pen N15.  Now, I will have to caution you that I used an older Dual Brush Pen for this particular lettering since writing on the wood frayed the brush end a bit.

And here is my finished Happy Fall Y'all sign, ready for my mantel.  I really love trying out new techniques and using traditional productions in unique ways.  Pushing the limits of my supplies to see what they are capable of, which allows me some great creative wins, but also results in some craft fails, which is perfectly OK, because that's how we learn!


I hope that you have enjoyed my Faux Pallet Pumpkins and you will use this project and the techniques I have shared today to showcase YOUR Tombow creativity!

Thanks for stopping by!
Creatively, Beth