Good Friday Morning, or should I say FRI-YAY! I have the pleasure of writing this post from my delightful room at the Quartermain House B & B, owned by my dear friend, Debra Quartermain. A lovely setting, but I will share more about this wonderful weekend in a blog post later.
Now on to business! Crafty business that is!
For the final round of the Tombow Design Team we were sent a box of supplies, of which we had to use at least 2 adhesives and at least 2 pens.
From that box of goodies, I put all of my inspiration into faux pallet pumpkins to decorate my Happy Fall Y'all sign. Follow along below to see how I created this sign and the techniques I utilized.
I always begin with a sketch and I have to say that I just LOVE the new
Tombow MONO Drawing Pens. The 05 is my go to for drawing, doodling and working out my designs on paper before I begin creating. Sometimes I color them in with
Tombow Dual Brush Pens.
STEP ONE:
I had this wooden pallet sign 12" by 15" in my craft stash, but it was the grey color was all wrong for a Fall themed projects, so I fixed that with
Tombow Dual Brush Pen 899 and a few baby wipes! Watch the video below to see how I did it!
STEP TWO:
Recently I found these giant craft sticks and just have to
hoard them add them to my collection of craft sticks. Creating faux pallet pumpkins in several sizes required craft sticks in several sizes. Line up three sizes of craft sticks in blocks and sketch pumpkins in in three different sizes using
MONO Drawing Pencil in 3H grade. Cut out the pumpkin shapes and trace onto the craft sticks.
STEP THREE:
Color the craft sticks with
Dual Brush Pens 933, 925 and 946 using the edge of the brush tip. Blend away the brush strokes with the Dual Brush Pen Blender N00.
STEP FOUR:
Carefully cut out each craft stick along the traced edge to create the pumpkin shapes.
For some of the cuts, I used a craft knife.
STEP FIVE:
Dual Brush Pens are extremely versatile. Place the cotton lace on the Blending Palette and spray with the Mister, both from the
Tombow Blending Kit. I colored the white lace with
Dual Brush Pen 020 to create an ivory lace to match the others in my stash. Set aside to dry.
STEP SIX:
To create leaves, color some plain paper flowers with shades of
Dual Brush Pens in Green 245, 195, 133, 173, 098 and 158 using a light and a dark tone for each.
Then spray until soaked with the Mister from the Blending Kit and set aside to dry.
STEP SEVEN:
To give the large pumpkin added interest and texture I added a swirl pattern with the bullet tip of the orange
TWINTONE from the Bright Set.
STEP EIGHT:
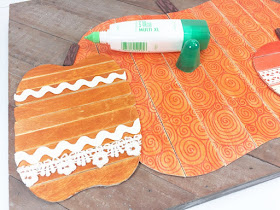
Color the smallest craft sticks with the bullet tip of the brown
TWINTONE from the Bright Set. Attach the lace and rick rack with T
ombow Xtreme Permanent Adhesive. Remember to roll to apply, then swipe the tip to the side for a clean application.
STEP NINE:
Layout the pumpkins on the wooden canvas until you are pleased with the composition, then attach with
MONO Multi Liquid Glue. The MONO Multi is perfect for the impatient crater, like me, because it has a strong bond and sets up quickly.
Attach the stems next.
STEP TEN:
Fold over and squish the paper flowers to create leaf shapes. Secure the layers and attach to the pumpkins with
Tombow Xtreme Tabs, which are clear and five times stronger than traditional tabs.
STEP ELEVEN:
The final step is LETTERING! I have grown to love and embrace my handwriting over this past year, so I measured out my saying HAPPY FALL Y'ALL to figure out where the middle was. Transfer those measurements to the wooden canvas and fill in the lettering using the brush tip of
Dual Brush Pen N15. Now, I will have to caution you that I used an older Dual Brush Pen for this particular lettering since writing on the wood frayed the brush end a bit.
And here is my finished Happy Fall Y'all sign, ready for my mantel. I really love trying out new techniques and using traditional productions in unique ways. Pushing the limits of my supplies to see what they are capable of, which allows me some great creative wins, but also results in some craft fails, which is perfectly OK, because that's how we learn!
I hope that you have enjoyed my Faux Pallet Pumpkins and you will use this project and the techniques I have shared today to showcase YOUR Tombow creativity!
Thanks for stopping by!
Creatively, Beth


